Okay, so, Butterfingers! Remember those? I swear, as a kid, I thought they were the *ultimate* candy bar. That flaky, peanut-buttery goodness… I was hooked. My first Butterfinger? Probably swiped from my older brother’s Halloween stash – don’t tell him! Anyway, all that Butterfinger love got me thinking… how could I turn that into the *perfect* dessert? And that’s how this easy Butterfinger Pie Recipe was born!
Seriously, this isn’t just *any* pie. We’re talking rich, creamy, and packed with that unmistakable Butterfinger flavor. And the best part? No baking required! That’s right, it’s a no-bake Butterfinger Pie Recipe, which means you can whip it up in no time. Trust me, if you’re a chocolate and peanut butter fan (and who isn’t?!), this pie will become your new obsession. It’s ridiculously easy but tastes like you spent hours on it. Get ready to impress!
Why You’ll Love This Butterfinger Pie Recipe
Listen, there are a million dessert recipes out there, but *this* one? This one’s special. Here’s why you’re gonna be obsessed:
Quick and Easy No-Bake Dessert
Seriously, who has time to bake these days? This Butterfinger Pie Recipe is ridiculously easy. Just mix, chill, and you’re done! Perfect for when you want something delish but don’t want to spend hours in the kitchen.
Irresistible Butterfinger Flavor
It’s like taking a bite of a Butterfinger, but in pie form! That amazing peanut butter and chocolate combo shines through in every single slice. You get that authentic Butterfinger taste, 100%!
Perfect for Any Occasion
Need a showstopper for a party? This Butterfinger Pie Recipe is it! Got a potluck coming up? This will be the first thing gone, I promise you. Or, you know, just want a simple dessert for the family? This works too!
Ingredients for the Perfect Butterfinger Pie Recipe
Alright, let’s gather our goodies! Here’s what you’ll need to make this magical Butterfinger Pie Recipe happen. Don’t skimp – good ingredients make a *huge* difference, trust me!
- 1 1/2 cups finely crushed chocolate wafer crumbs (I like the Nabisco Famous ones!)
- 6 tablespoons unsalted melted butter (yes, real butter!)
- 8 ounces cream cheese, softened to room temperature (super important!)
- 1 (14 ounce) can sweetened condensed milk (not evaporated milk, okay?)
- 1 teaspoon pure vanilla extract (the *good* stuff)
- 8 ounces frozen whipped topping, thawed completely (Cool Whip works great)
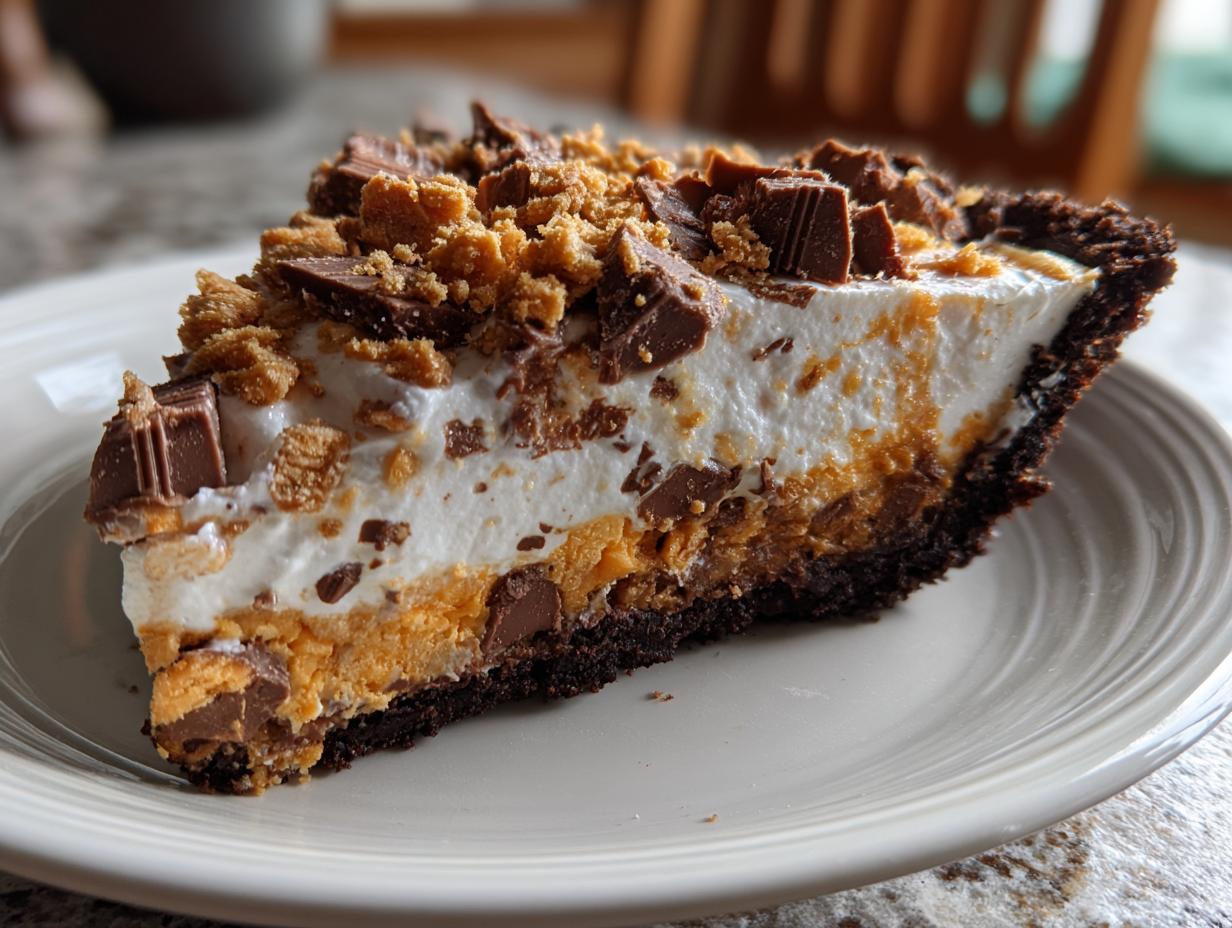
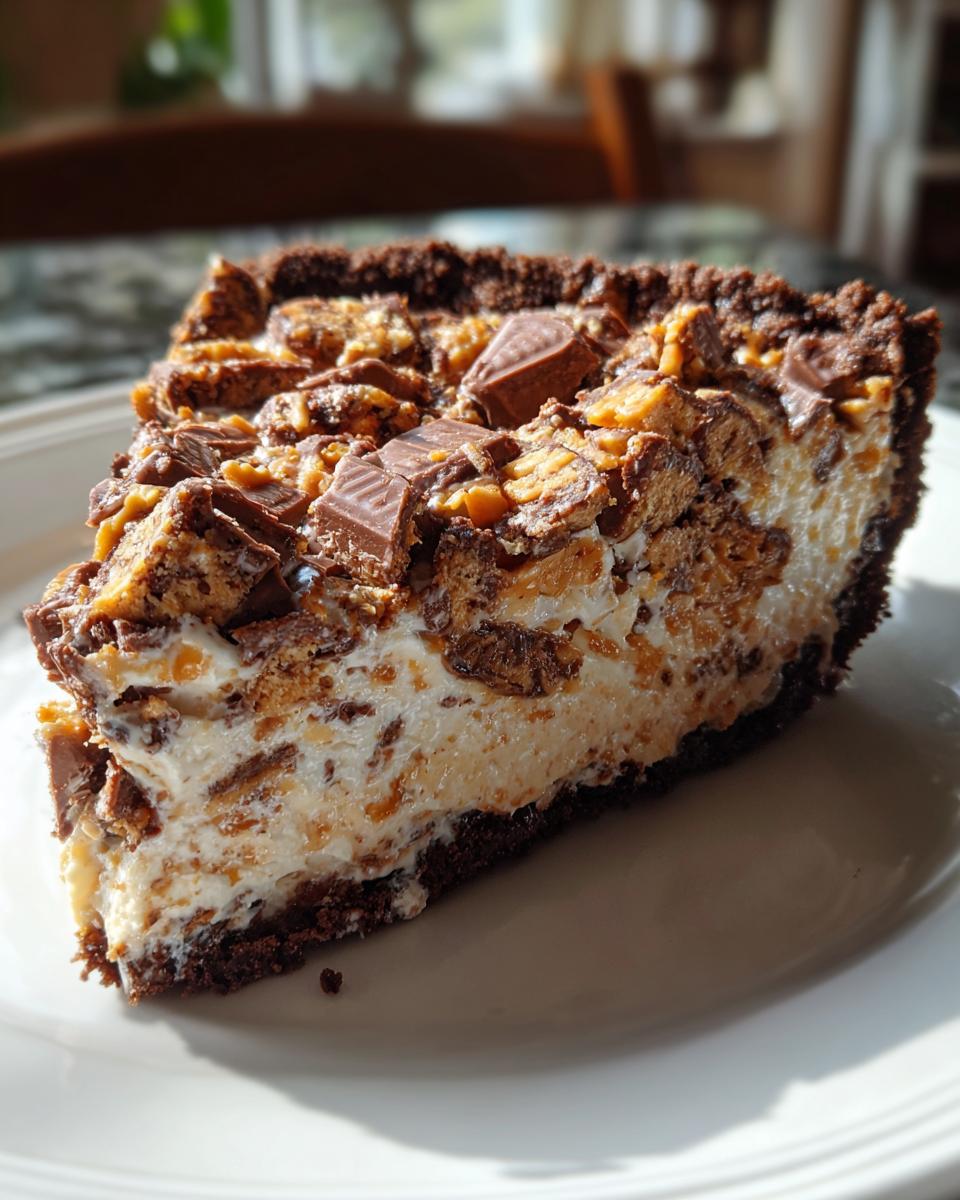
- 5 full-size Butterfinger candy bars, coarsely chopped (the star of the show!)
How to Make This Butterfinger Pie Recipe: Step-by-Step Instructions
Okay, get ready to become a Butterfinger Pie master! I’ve broken it down into super-easy steps, so even if you’re a total newbie in the kitchen, you can nail this. Just follow along, and you’ll be enjoying a slice of heaven in no time. Remember that chilling time is KEY! Don’t rush it!
Prepare the Chocolate Wafer Crust
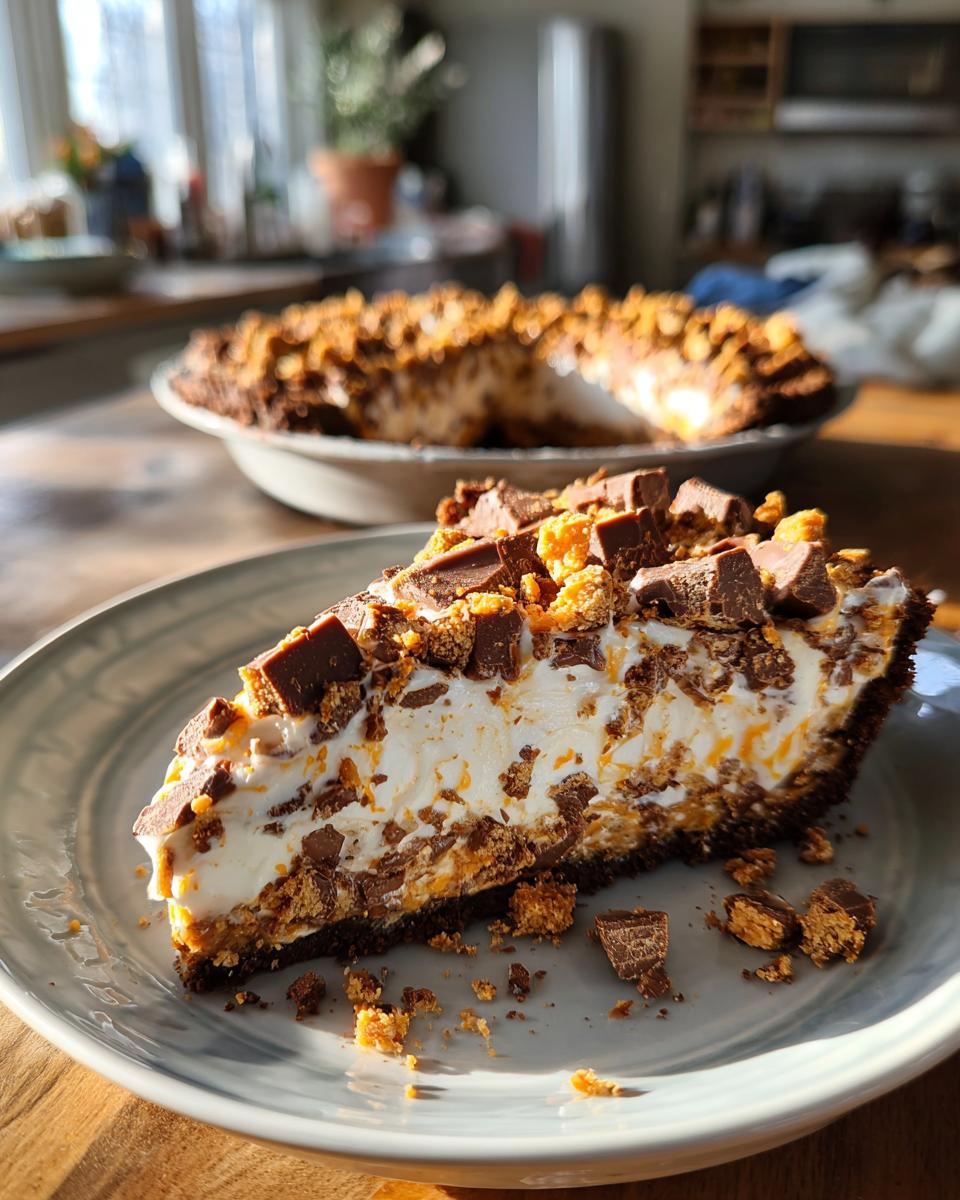
First, grab a pie plate (9-inch is perfect). In a bowl, mix those chocolate wafer crumbs with the melted butter until everything’s nicely coated. Press that mixture firmly into the bottom and up the sides of the pie plate. You want it nice and compact, so it holds everything together. I sometimes use the bottom of a measuring cup to really get it in there good.
Make the Creamy Butterfinger Filling
Now for the fun part! In a large bowl, beat the softened cream cheese until it’s smooth and creamy. Seriously, make sure it’s *softened* – otherwise, you’ll end up with lumpy filling, and nobody wants that! Gradually beat in the sweetened condensed milk and vanilla extract until everything is well combined and silky smooth. Next, gently fold in the thawed whipped topping and those glorious chopped Butterfinger candy bars. Don’t overmix! You want those Butterfinger pieces to stay chunky and distinct.
Chill and Serve Your Butterfinger Pie Recipe
Pour that amazing Butterfinger filling into your prepared chocolate wafer crust. Spread it out evenly, so every slice is perfect. Now comes the hard part: waiting! Cover the pie with plastic wrap (gently, so it doesn’t stick to the filling) and refrigerate for at least 4 hours, or even better, overnight. This gives everything time to set up properly. Before serving, garnish with extra chopped Butterfinger pieces for that final touch of awesomeness. Enjoy every single bite!
Tips for the Best Butterfinger Pie Recipe
Want to take your Butterfinger Pie Recipe from “good” to “OMG AMAZING”? Here are my tried-and-true tips for pie perfection. These little things make all the difference, so pay attention!
Don’t Overmix the Filling
Seriously, resist the urge! Overmixing can make your filling tough and dense, and nobody wants that. Just gently fold in the whipped topping and Butterfinger pieces until everything’s *just* combined.
Use Quality Ingredients for Best Flavor
I know it’s tempting to grab the cheapest stuff, but trust me, good ingredients = good pie! Spring for the real vanilla extract and the good cream cheese. You’ll taste the difference, I promise!
Chill the Crust Before Filling
Okay, this is a sneaky trick. Popping your prepared chocolate wafer crust in the fridge (or even the freezer for a few minutes) before adding the filling helps it firm up. That way, you won’t end up with a soggy bottom, and your pie will slice like a dream!

Butterfinger Pie Recipe Variations
Okay, so you’ve mastered the basic Butterfinger Pie Recipe, right? Now let’s get a little crazy! Here are some fun ways to mix things up and make it your own. This pie is seriously a blank canvas for deliciousness!
Try a Different Crust
Chocolate wafers are classic, but why not experiment? An Oreo crust would be AMAZING (just scrape out the filling first!). Or, for a totally different vibe, try a graham cracker crust. Yum!
Add Peanut Butter for Extra Flavor
Okay, this might be overkill, but I’m a peanut butter fanatic, so I gotta suggest it! Swirl a little melted peanut butter into the filling before you pour it into the crust. You won’t regret it!
Experiment with Toppings
Chopped Butterfingers are a must, but don’t stop there! Chocolate shavings add a touch of elegance. A dollop of whipped cream is always welcome. Or, go totally wild and add a drizzle of chocolate sauce or a sprinkle of chopped peanuts. The possibilities are endless!
Frequently Asked Questions About This Butterfinger Pie Recipe
Got questions? I got answers! Here are some of the most common things people ask me about this amazing Butterfinger Pie Recipe. Don’t be shy – if you’re wondering, someone else probably is too!
Can I make this Butterfinger Pie Recipe ahead of time?
Heck yeah, you can! In fact, I *recommend* it! Making this Butterfinger Pie Recipe a day ahead of time actually lets the flavors meld together even more, making it even more delicious! Just keep it covered in the fridge, and you’re good to go.
How do I store leftover Butterfinger Pie Recipe?
Easy peasy! Just cover any leftover Butterfinger Pie with plastic wrap or transfer it to an airtight container and pop it back in the fridge. It’ll keep for about 3-4 days… if it lasts that long! Let’s be real, it probably won’t!
Can I use a different type of candy bar?
Okay, purists might cringe, but sure, you *could*! But honestly, the Butterfinger is what makes this pie so special. If you absolutely *must* substitute, maybe try another peanut butter cup type candy bar, but it won’t be the same. Trust me on this one!
Serving Suggestions for Your Butterfinger Pie Recipe
Alright, you’ve got this gorgeous Butterfinger Pie Recipe sitting in front of you… now what? Well, here are a few ideas to take it to the next level. Because why not, right?
Pair With Coffee or Milk
Okay, this is a no-brainer. A slice of this pie with a hot cup of coffee? Perfection! Or, if you’re feeling more kid-at-heart, a tall glass of cold milk is *always* a winner.
Add a Scoop of Ice Cream
Vanilla ice cream is a classic choice – the creamy coolness is the perfect contrast to the rich pie. But if you wanna go full-on chocolate overload, chocolate ice cream is the way to go!
Nutritional Information for Butterfinger Pie Recipe
Okay, so, quick disclaimer: I’m not a nutritionist! The nutritional info for this Butterfinger Pie Recipe will totally vary depending on the brands you use, so don’t take it as gospel, okay?
Enjoyed This Butterfinger Pie Recipe?
So, did you fall head-over-heels for this Butterfinger Pie Recipe like I did? I *really* wanna know! If you gave it a whirl, leave a comment below and tell me what you think! And hey, if you loved it, give it a rating – it helps other pie-lovers find this amazing recipe! Sharing is caring, so spread the Butterfinger love on social media too!
Print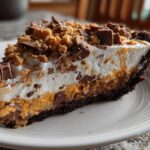
Devilish 4-Hour Butterfinger Pie Recipe Revealed
- Prep Time: 20 minutes
- Cook Time: 0 minutes
- Total Time: 4 hours 20 minutes
- Yield: 8 servings 1x
- Category: Dessert
- Method: No-Bake
- Cuisine: American
- Diet: Vegetarian
Description
A rich and creamy Butterfinger Pie, perfect for dessert lovers.
Ingredients
- 1 1/2 cups chocolate wafer crumbs
- 6 tablespoons melted butter
- 8 ounces cream cheese, softened
- 1 (14 ounce) can sweetened condensed milk
- 1 teaspoon vanilla extract
- 8 ounces frozen whipped topping, thawed
- 5 Butterfinger candy bars, chopped
Instructions
- Combine chocolate wafer crumbs and melted butter. Press into a pie plate.
- Beat cream cheese until smooth.
- Gradually beat in sweetened condensed milk and vanilla.
- Fold in whipped topping and chopped Butterfinger candy bars.
- Pour into crust.
- Refrigerate for at least 4 hours.
- Garnish with additional Butterfinger pieces before serving.
Notes
- For a richer flavor, use a chocolate crust.
- You can substitute homemade whipped cream for the frozen whipped topping.
- Store leftovers in the refrigerator.
Nutrition
- Serving Size: 1 slice
- Calories: 450
- Sugar: 40g
- Sodium: 200mg
- Fat: 25g
- Saturated Fat: 15g
- Unsaturated Fat: 8g
- Trans Fat: 1g
- Carbohydrates: 50g
- Fiber: 2g
- Protein: 5g
- Cholesterol: 50mg