Oh, holiday baking! Is there anything better? The smells, the sprinkles, the *joy* of creating something delicious to share. And these Melting Snowman Cookies? They’re just the cutest, most festive things EVER. Seriously, every time I make them, I can’t help but smile. They’re a total showstopper! This Melting Snowman Cookies Recipe is going to be your new go-to for Christmas.
I remember one year, I tried to make gingerbread houses with my niece and nephew. Total disaster! The walls kept collapsing, the icing was everywhere… But you know what saved the day? A batch of these very cookies. Suddenly, everyone was happy, decorating their little snowmen, and all was right with the world. That’s the magic of a good Melting Snowman Cookies Recipe, I tell ya!
Why You’ll Love This Melting Snowman Cookies Recipe
Simple and Fun to Make
Seriously, these aren’t fussy at all! Even if you’re not a super experienced baker, you can totally nail this. Plus, decorating them is a blast – get the kids involved!
Perfect for Holiday Baking
I mean, come ON. Melting snowmen? Is there anything more festive? These are *the* cookies to bring to your next holiday party, trust me.
Guaranteed to Bring Smiles
Honestly, the cutest cookies EVER. They’re impossible to resist, and they just make everyone happy. What’s not to love?
Gathering Your Ingredients for Melting Snowman Cookies Recipe
Alright, let’s get our stuff together! Before we even think about preheating the oven, let’s make sure we have everything we need. Nothing’s worse than getting halfway through a recipe and realizing you’re missing something, right? This Melting Snowman Cookies Recipe is pretty straightforward, but good ingredients make ALL the difference.
Cookie Dough Ingredients
Okay, for the cookies themselves, you’ll need: 1 cup (that’s 2 sticks!) of unsalted butter, and make *sure* it’s softened. Trust me on this one! You also need 1 cup of granulated sugar, 1 teaspoon of vanilla extract (the real stuff!), 1 large egg, 2 1/2 cups of all-purpose flour, 1/2 teaspoon of baking powder, and 1/4 teaspoon of salt. Got it?
Snowman Decoration Ingredients
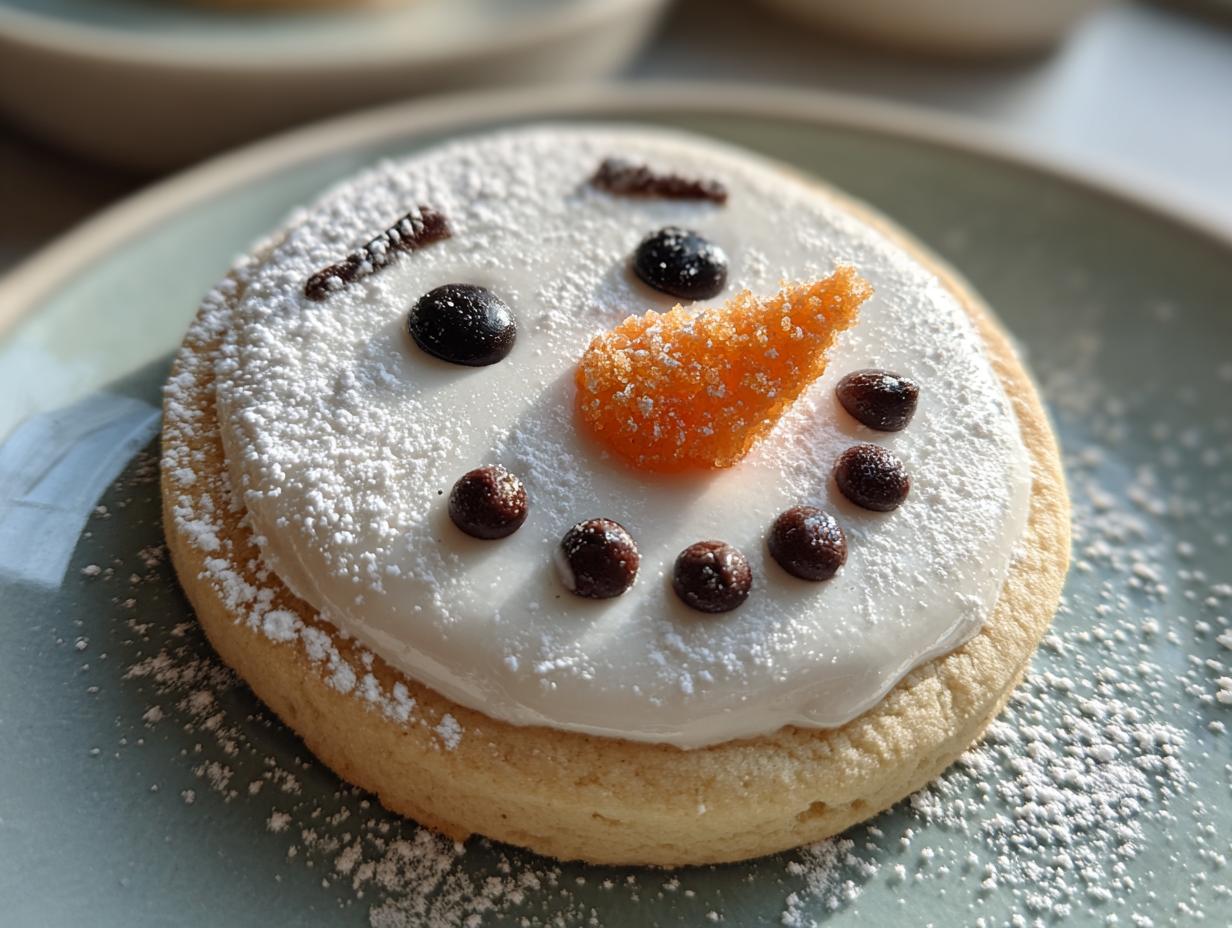
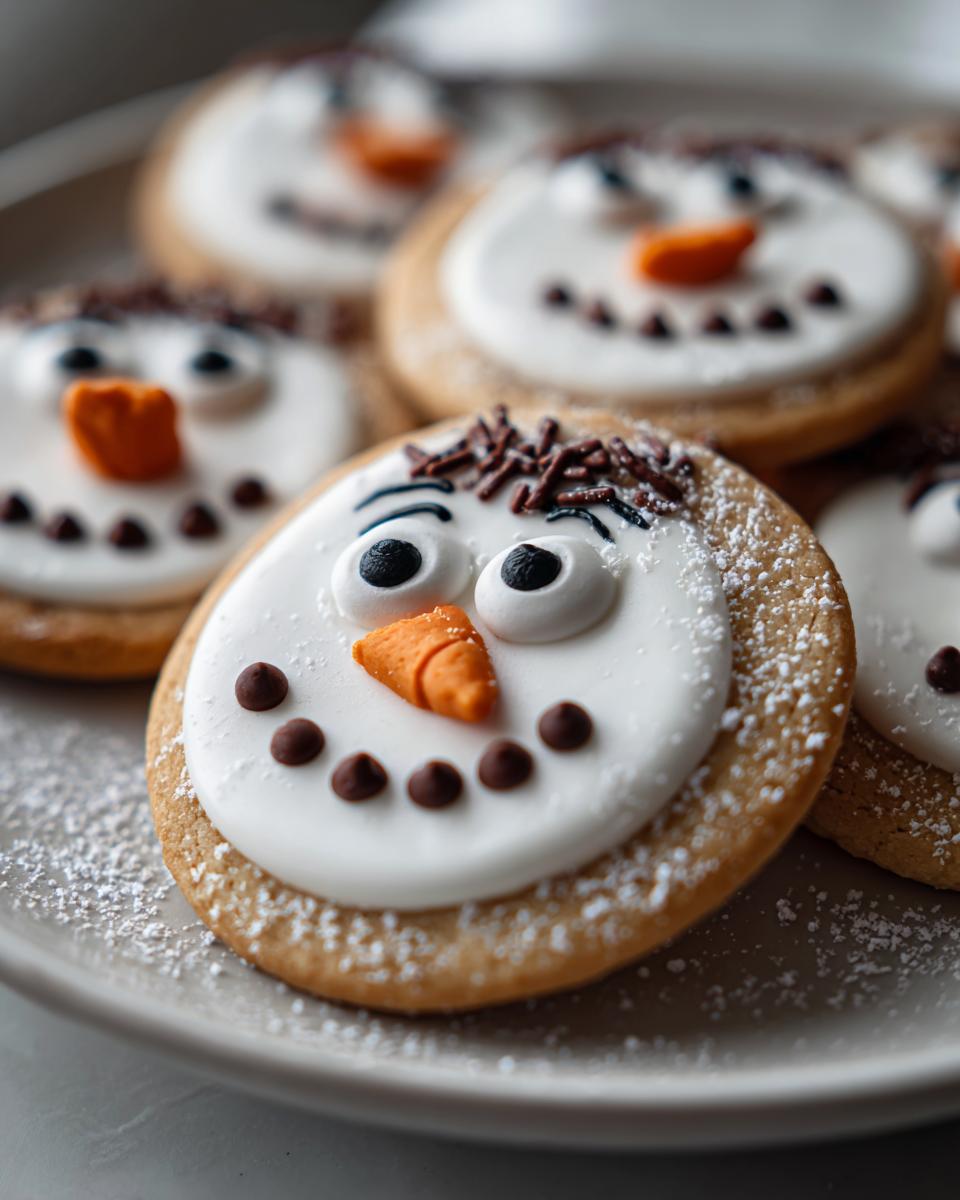
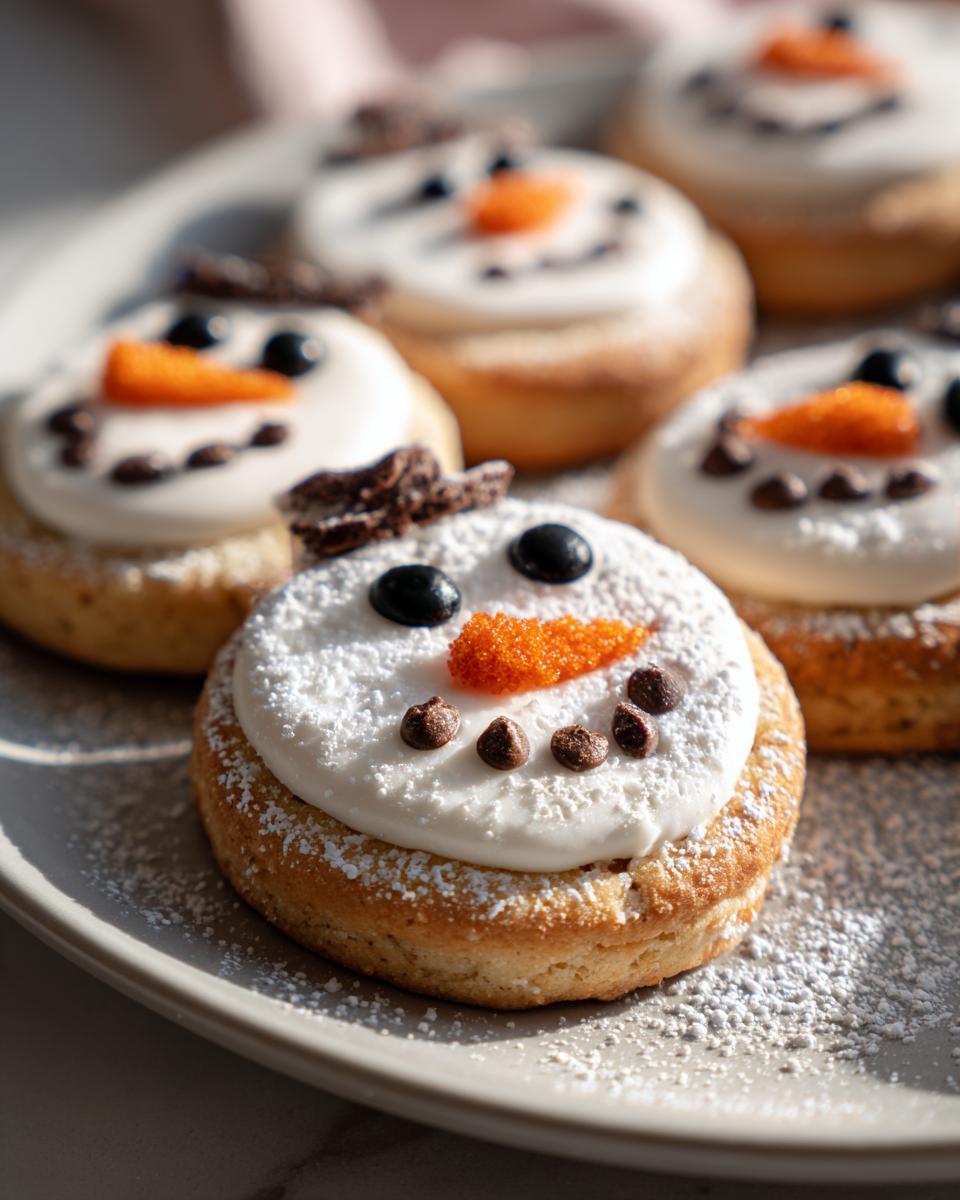
Now for the fun part – decorating! You’ll need white fondant (you can find this at most craft stores), a black edible marker (these are lifesavers!), orange sprinkles (for the noses, of course!), mini chocolate chips (for the buttons!), and plenty of powdered sugar (for that melty snow effect!)
How to Make Melting Snowman Cookies Recipe: Step-by-Step Instructions
Okay, here’s where the magic happens! Don’t be scared, it’s easier than you think. Just follow these steps, and you’ll have adorable melting snowmen in no time. I promise, it’s worth it!
Preparing the Cookie Dough for Your Melting Snowman Cookies Recipe
First things first, we gotta make the dough! Grab that softened butter and sugar and cream them together in a large bowl. You want it light and fluffy – this usually takes a few minutes. Then, beat in the vanilla extract and the egg. Make sure everything is nicely combined. In a separate bowl, whisk together the flour, baking powder, and salt. Gradually add the dry ingredients to the wet ingredients, mixing until *just* combined. Don’t overmix! Overmixing makes tough cookies, and nobody wants that.

Baking Your Melting Snowman Cookies Recipe
Alright, preheat your oven to 375°F (190°C). Now, roll out the dough on a lightly floured surface. Cut out circles using a cookie cutter – any size you like! Place the cookies on a baking sheet lined with parchment paper. This is important, or they’ll stick! Bake for 8-10 minutes, or until the edges are *lightly* golden. Keep a close eye on them! Nobody likes burnt cookies. Let the cookies cool *completely* on a wire rack before decorating. Patience is key here, folks!
Decorating Your Melting Snowman Cookies Recipe
Now for the fun part! Roll out the white fondant and cut out circles to match the size of your cookies. Adhere the fondant to the cookies – a little bit of water helps it stick. Use that black edible marker to draw on some adorable eyes and a mouth. Add an orange sprinkle for the nose – so cute! Place mini chocolate chips for buttons. Finally, dust powdered sugar around the edges of the cookies to create that melty effect. Ta-da! You’ve got yourself a melting snowman!
Tips for the Best Melting Snowman Cookies Recipe
Don’t Overbake
Seriously, watch those cookies like a hawk! Overbaking will make them dry and crumbly, and nobody wants a sad, dry snowman. Aim for lightly golden edges, and take them out even if they seem a *tiny* bit soft. They’ll firm up as they cool, I promise!
Soften Butter Properly
This is HUGE. Don’t even *think* about using melted butter, and cold butter is a no-go too! You want it soft enough that you can easily press a finger into it, but not greasy. This helps it cream properly with the sugar, which is key to a tender cookie.
Use High-Quality Ingredients
Okay, I know it’s tempting to skimp, but trust me on this one. Good butter, real vanilla, fresh sprinkles… it all makes a difference! Your melting snowmen will taste even more amazing if you use the best stuff you can find. Treat yourself!
Ingredient Notes and Substitutions for your Melting Snowman Cookies Recipe
Okay, so maybe you’re missing an ingredient, or maybe you just wanna switch things up a bit? No problem! Baking’s all about experimenting, right? Here are a few swaps you can make in this Melting Snowman Cookies Recipe without totally messing things up.
Fondant Alternatives
Not a fan of fondant? I get it! It can be a little… finicky. Royal icing is a fab alternative! It dries hard, so your snowmen will be nice and crisp. You could even use a thick buttercream frosting if you’re feeling extra decadent. Just remember, it won’t harden like fondant or royal icing, so be careful with those melty edges!
Butter Substitutions
Alright, so butter is best, BUT if you’re in a pinch, you *can* use margarine or shortening. Just know that your cookies might taste a little different – less rich, maybe a bit more… artificial? Use unsalted margarine if you go that route, and shortening will make them a bit softer. Butter just gives the best flavor, though!
Flour Options
Wanna make these gluten-free? Awesome! Just swap out the all-purpose flour for a gluten-free blend. I recommend one that’s specifically designed for baking – it’ll have a mix of flours and starches to mimic the texture of regular flour. Just follow the package directions, and you’ll have yummy, gluten-free melting snowmen!
Storing Your Melting Snowman Cookies Recipe
Okay, so you’ve made these adorable Melting Snowman Cookies… and somehow, you have leftovers? Wow! Here’s how to keep ’em fresh and delicious.
Storing Decorated Cookies
These guys are a little delicate because of the fondant. The best way to keep them happy is in a single layer in an airtight container. Don’t stack them, or you’ll smoosh those cute little faces! Keep them at room temperature, away from direct sunlight, and they should be good for a few days.
Freezing Cookie Dough
Wanna get ahead of the game? You can totally freeze the cookie dough! Just wrap it tightly in plastic wrap and then pop it in a freezer bag. It’ll keep for a month or two. When you’re ready to bake, let it thaw in the fridge overnight, and you’re good to go! Easy peasy!
Frequently Asked Questions About Melting Snowman Cookies Recipe
Got questions? I got answers! Here are a few things people always ask me about this Melting Snowman Cookies Recipe. Don’t worry, I’ve got you covered!
Can I make the dough ahead of time?
Absolutely! In fact, I often do. Just make the dough, wrap it well in plastic wrap, and stash it in the fridge for up to 2 days. Or, for longer storage, freeze it! Just thaw it overnight in the fridge before rolling it out. Easy peasy!
How do I prevent the fondant from cracking?
Ah, fondant. It can be a bit temperamental, can’t it? The key is to work with it when it’s pliable. If it’s too stiff, knead it a bit to warm it up. Also, roll it out on a surface dusted with powdered sugar to prevent sticking. And don’t roll it too thin, or it’ll definitely crack. A little bit thicker is better!
Can I use different sprinkles?
Of course! Get creative! Orange sprinkles are classic for the noses, but you could use red hots, mini M&Ms, or even little pieces of candy corn. Get the kids involved and let them go wild with the decorations! It’s all about having fun!
Nutritional Information for Melting Snowman Cookies Recipe
Okay, so you might be wondering, “How naughty are these adorable little guys?” Well, here’s the estimated nutritional info! Keep in mind, this is just an estimate, and it can vary depending on the exact ingredients you use. But hey, it’s the holidays! A little indulgence is totally okay, right?
We’re talking typical nutritional values like Calories, Fat (both saturated and unsaturated!), Protein, Carbs, Sugar, Sodium, and Cholesterol. Just a heads up – this is an estimate, so don’t take it as gospel! But it’ll give you a general idea of what you’re working with. Enjoy those Melting Snowman Cookies in moderation, and happy baking!
Spread the Holiday Cheer with This Melting Snowman Cookies Recipe
Made these adorable Melting Snowman Cookies? I’d LOVE to hear about it! Leave a comment, rate the recipe, or share your pics on social media! Happy baking!
Print
Melting Snowman Cookies Recipe: 3 Awesome Secrets
- Prep Time: 30 minutes
- Cook Time: 8-10 minutes
- Total Time: 45 minutes
- Yield: About 24 cookies 1x
- Category: Dessert
- Method: Baking
- Cuisine: American
- Diet: Vegetarian
Description
Create adorable Melting Snowman Cookies with this simple recipe. These festive treats are perfect for holiday baking and guaranteed to bring smiles.
Ingredients
- 1 cup (2 sticks) unsalted butter, softened
- 1 cup granulated sugar
- 1 teaspoon vanilla extract
- 1 large egg
- 2 1/2 cups all-purpose flour
- 1/2 teaspoon baking powder
- 1/4 teaspoon salt
- White fondant
- Black edible marker
- Orange sprinkles
- Mini chocolate chips
- Powdered sugar
Instructions
- Preheat oven to 375°F (190°C).
- In a large bowl, cream together butter and sugar until light and fluffy. Beat in vanilla and egg.
- In a separate bowl, whisk together flour, baking powder, and salt. Gradually add to wet ingredients, mixing until just combined.
- Roll out dough on a lightly floured surface and cut out circles using a cookie cutter.
- Place cookies on a baking sheet lined with parchment paper.
- Bake for 8-10 minutes or until edges are lightly golden.
- Let cookies cool completely on a wire rack.
- Roll out white fondant and cut out circles to match the size of the cookies. Adhere fondant to cookies.
- Use a black edible marker to draw eyes and a mouth.
- Add an orange sprinkle for the nose.
- Place mini chocolate chips for buttons.
- Dust powdered sugar around the edges of the cookies to create a melting effect.
Notes
- For best results, use high-quality ingredients.
- Make sure the butter is softened before creaming with sugar.
- Do not overbake the cookies to keep them soft.
- Store cookies in an airtight container at room temperature.
Nutrition
- Serving Size: 1 cookie
- Calories: 150
- Sugar: 12g
- Sodium: 30mg
- Fat: 7g
- Saturated Fat: 4g
- Unsaturated Fat: 2g
- Trans Fat: 0g
- Carbohydrates: 20g
- Fiber: 0g
- Protein: 1g
- Cholesterol: 25mg