Is there anything better than a batch of homemade sugar cookies during the holidays? I think not! The best part? Decorating them, of course! But, ugh, the *worst* part? Icing that just WON’T set. You spend all that time making pretty designs, and then BAM! Smudges everywhere. Sticky cookies. Total disaster.
Well, say goodbye to icing fails! This *Sugar Cookie Icing That Hardens* recipe is here to save the day. Seriously, it’s a game-changer. You get a smooth, glossy finish that’s actually HARD, so you can stack those cookies high and they’ll still look amazing. And the best part? It’s SO easy to make! I’m talking, like, five minutes easy. My kids and I whip up a batch every year – it’s our favorite tradition!
Why You’ll Love This Sugar Cookie Icing That Hardens
Perfect for Detailed Decorating
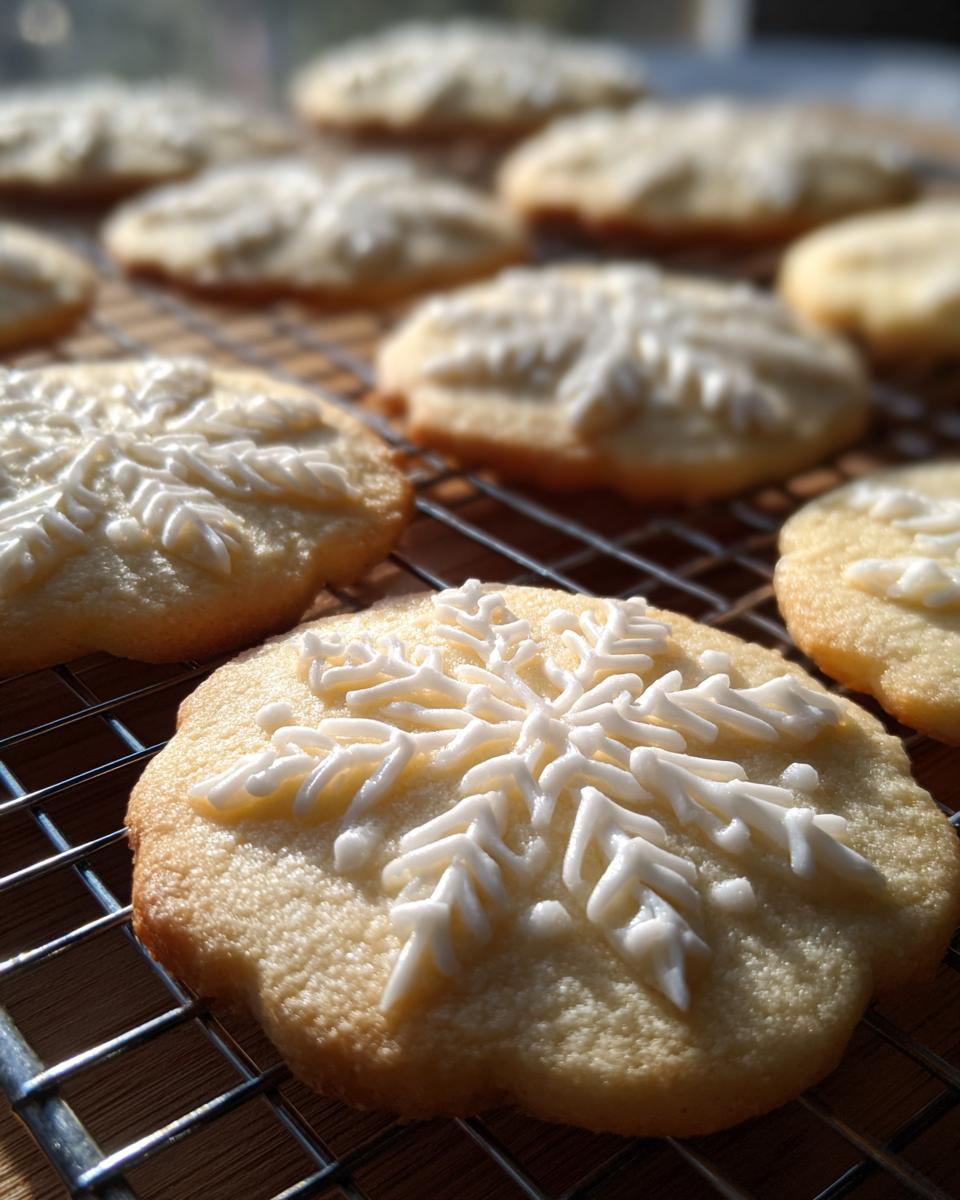
Okay, let’s be real. The whole point of sugar cookies is to go crazy with the decorations, right? This icing is *amazing* because it actually hardens! That means you can make all sorts of intricate designs – think snowflakes, reindeer, the works! – without worrying about them turning into a big, smudged mess. Trust me, it’s a lifesaver when you’re trying to make those picture-perfect cookies.
Simple Ingredients
You know I’m all about keeping things easy! This icing uses stuff you probably already have in your pantry. Powdered sugar, a little milk (or water!), maybe some vanilla… that’s it! No weird ingredients you have to hunt down at specialty stores. Simple, straightforward, and totally delicious. What’s not to love?
Quick and Easy to Make
Seriously, I can whip up a batch of this icing faster than my kids can argue over who gets to lick the spoon (and that’s saying something!). We’re talking, like, five minutes, tops. No complicated steps, no fancy equipment. Just mix and go! It’s perfect for when you’re short on time but still want to make something special.
Beautiful, Glossy Finish
Let’s be honest: we eat with our eyes first! This icing isn’t just functional, it’s gorgeous. It hardens to a beautiful, glossy finish that makes your sugar cookies look like they came straight out of a bakery window. It’s the perfect finishing touch to all your hard work. My favorite part is seeing how shiny they look under the Christmas tree lights!
Ingredients for Sugar Cookie Icing That Hardens
Alright, let’s gather our goodies! This recipe’s super simple, so you probably have everything you need already. Here’s the lineup:
- 2 cups sifted powdered sugar: Seriously, don’t skip the sifting! It makes a HUGE difference in how smooth your icing turns out. Trust me on this one.
- 3-4 tablespoons milk or water, plus more as needed: I usually start with 3 tablespoons and then add a little more at a time until I get the right consistency. You can use milk or water – I honestly don’t think it makes a massive difference, but I usually go with milk ’cause, well, it’s already in the fridge!
- ½ teaspoon pure vanilla extract (optional): Vanilla adds a nice little something-something, but if you’re not a fan, leave it out! Or, hey, get crazy and use almond extract – yum!
- Gel food coloring (optional), in various colors: Okay, this is where the fun begins! Gel food coloring is the way to go here. It gives you super vibrant colors without adding a ton of extra liquid. Plus, a tiny bit goes a long way, so your icing doesn’t get all watery.
How to Make Sugar Cookie Icing That Hardens: Step-by-Step Instructions
Preparing the Icing Base
Okay, time to get mixing! Grab a bowl – any bowl will do, honestly – and dump in that sifted powdered sugar. Then, pour in 3 tablespoons of your milk or water. Now, grab a whisk (a fork works in a pinch, but a whisk is best to avoid lumps!) and start whisking away! You want to whisk until everything’s combined and it’s looking pretty smooth. It should be kinda thick at this point, but don’t worry, we’ll fix that! What you’re aiming for is a smooth, flowing consistency – almost like honey. Yum!
Achieving the Perfect Consistency for Sugar Cookie Icing That Hardens
This is the trickiest part, but don’t stress! It’s all about adding the *right* amount of liquid. If your icing is too thick (like, you could build a house with it), add more milk or water, but just a teaspoon at a time! Seriously, a little goes a long way. Whisk it in, then check the consistency. How do you check? Easy! Lift your whisk out of the icing. The icing should slowly drizzle back into the bowl. If it plops back in a big blob, it’s still too thick. If it’s super runny and disappears right away, oops! Too thin! (We’ll fix that later). You want it to hold its shape for a second or two before melting back into the bowl. Got it?
Adding Flavor and Color
Now for the fun part! If you’re using vanilla extract, stir it in now. Just a half teaspoon is all you need. Then, if you want different colors (and who doesn’t?!), divide your icing into separate bowls. I like to use little ramekins, but anything works. Add a tiny drop of gel food coloring to each bowl and stir, stir, stir! Remember, gel food coloring is super concentrated, so start with just a tiny bit. You can always add more if you want a brighter color. And trust me, gel is the way to go – liquid food coloring can make your icing too thin super fast!

Decorating Your Cookies with Sugar Cookie Icing That Hardens
Alright, artist time! You can just slather the icing on with a spoon (hey, no judgment!), but for more detailed designs, I highly recommend using piping bags or squeeze bottles. You can find them at most craft stores or even some grocery stores. Fill ’em up with your icing and get creative! Swirls, dots, stripes… the possibilities are endless! Don’t be afraid to experiment and have fun! And hey, if you mess up? Just scrape it off and start again! That’s the beauty of sugar cookies, right?
Hardening and Storage
Okay, you’ve decorated your masterpieces. Now comes the hardest part: waiting! You need to let the icing harden completely before you even *think* about storing them. This can take a few hours, or even overnight, depending on how thick your icing is and how humid it is in your house. The best way to do it is to place your cookies on a wire rack in a cool, dry place. This helps the air circulate and speeds up the hardening process. Once the icing is completely hard (like, you can touch it without it smudging), you can store your cookies in an airtight container. Yay! You did it!
Tips for the Best Sugar Cookie Icing That Hardens
Use Sifted Powdered Sugar
I’m telling you, this is a non-negotiable! Sifting the powdered sugar is the key to getting that super smooth, lump-free icing we’re all after. Nobody wants bumpy icing, right? Just run the powdered sugar through a sifter or even a fine-mesh sieve before you start mixing. It only takes a minute, and it makes a world of difference. Seriously, don’t skip it!
Add Liquid Gradually
I know, I know, I already said this. But it’s *so* important, it bears repeating! Adding the liquid slowly, like, a teaspoon at a time, is the best way to avoid accidentally making your icing too thin. It’s way easier to add more liquid than it is to try and thicken it up once you’ve gone too far. So, be patient! Trust me, your cookies will thank you.
Test the Icing Consistency
Okay, so how do you *really* know if your icing is the right consistency? Here’s my trick: grab a spoon and drizzle a little bit of icing back into the bowl. Count how long it takes for the drizzle to disappear back into the rest of the icing. If it disappears in, like, 5-10 seconds, you’re golden! If it disappears instantly, it’s too thin. If it takes forever, it’s too thick. Easy peasy!
Be Patient During Hardening
This is the hardest part, I know! You just wanna dive in and eat those cookies, right? But resist the urge! The hardening time can vary depending on how humid it is in your kitchen. If it’s a super humid day, it’s gonna take longer. Just let the cookies sit out on a wire rack in a cool, dry place. And don’t touch them! The more you mess with them, the more likely you are to smudge the icing. Trust me, patience is a virtue when it comes to sugar cookies!
Ingredient Notes and Substitutions for Sugar Cookie Icing That Hardens
Milk vs. Water
Okay, so you’re probably wondering: does it *really* matter if I use milk or water? Honestly? Not a TON. I usually use milk because it’s already in the fridge, and it adds a *tiny* bit of richness. But water works just fine! If you’re dairy-free, definitely go with water. You can also use non-dairy milk, like almond milk or soy milk. Just keep in mind that some non-dairy milks have a stronger flavor, so it might affect the taste of your icing a little bit. But hey, experiment and see what you like!
Vanilla Extract Alternatives
Vanilla extract is classic, but don’t be afraid to get creative! Almond extract is SO good in sugar cookie icing – it gives it a really nice, nutty flavor. Lemon extract is another great option, especially if you’re making cookies with lemon zest. A tiny bit of peppermint extract can be fun for the holidays, too! Just remember, extracts are potent, so start with a very small amount and add more to taste. You don’t want your cookies to taste like straight-up extract!
Powdered Sugar Options
Did you know there are different kinds of powdered sugar? Okay, maybe you did. But honestly, for this recipe, the regular stuff you find at the grocery store is totally fine! Sometimes you’ll see “confectioners’ sugar” – that’s just another name for powdered sugar. I wouldn’t recommend using brown powdered sugar (if that’s even a thing?) because it’ll change the color of your icing. Just stick with the classic white powdered sugar, and you’ll be golden!
Frequently Asked Questions About Sugar Cookie Icing That Hardens
How long does it take for Sugar Cookie Icing That Hardens to harden completely?
Okay, so this is the million-dollar question, right? Honestly, it depends! Usually, it takes anywhere from 3 to 6 hours for the icing to fully harden. But, humidity plays a HUGE role. If it’s a super humid day, it could take even longer, maybe overnight. The best way to check is to gently touch the icing. If it’s still sticky, it needs more time. If it’s firm and doesn’t smudge, you’re good to go!
Can I use this Sugar Cookie Icing That Hardens for gingerbread houses?
You know what? You totally *can* use this icing for gingerbread houses! It’s not as rock-solid as royal icing (which is what most people use), but it’ll definitely work for sticking on candies and decorations. Just keep in mind that it might not be strong enough to hold up super heavy elements. If you’re building a mega-structure, you might want to go with royal icing for the main construction. But for decorating? This sugar cookie icing is perfect!
What if my Sugar Cookie Icing That Hardens is too thick or too thin?
Oops! It happens to the best of us! If your icing is too thick, just add a tiny bit more milk or water – like, a teaspoon at a time – until you get the right consistency. If it’s too thin (uh oh!), add a little more sifted powdered sugar, a tablespoon at a time, until it thickens up. Just remember to stir it really well after each addition to make sure everything’s combined. Don’t panic! You can totally fix it!
How do I store decorated Sugar Cookie Icing That Hardens cookies?
Alright, so you’ve got your beautifully decorated cookies, and you wanna make sure they stay that way, right? The key is to store them in an airtight container. I like to use those plastic containers with the snap-on lids. If you’re stacking the cookies, put a layer of parchment paper between each layer to prevent them from sticking together. And keep them in a cool, dry place – not in the fridge! The fridge can actually make the icing get sticky again.
Storing Your Sugar Cookie Icing That Hardens Cookies
So, you’ve got all these gorgeous, decorated cookies… and maybe a few leftover (if you didn’t eat them all already!). How do you keep them fresh and prevent that beautiful icing from getting all messed up? Here’s the deal:
First things first: make sure that icing is *completely* hardened before you even think about storing them! I’m talking rock-solid, touch-it-without-smudging hard. Otherwise, you’re just asking for a sticky situation.
The best way to store these bad boys is in an airtight container. I love those plastic containers with the snap-on lids – they’re perfect! If you’re stacking the cookies (and let’s be honest, who isn’t?), put a layer of parchment paper or wax paper between each layer. This will prevent them from sticking together and messing up the icing designs. Nobody wants a cookie catastrophe!
Now, here’s a little secret: don’t put them in the fridge! I know, it seems counterintuitive, but the fridge can actually make the icing get sticky again. Just keep them in a cool, dry place – like on your counter or in a pantry. They should stay fresh for several days, maybe even a week (if they last that long!).
And hey, if you have any leftover icing (which is rare in my house!), you can store it in an airtight container in the fridge. It might get a little hard, but you can just add a tiny bit of milk or water to thin it out when you’re ready to use it again. Easy peasy!
Nutritional Information
Okay, so I know you’re probably wondering about the nutritional info for this sugar cookie icing that hardens. But, honestly, it’s kinda hard to say exactly! It really depends on what brands of ingredients you use and how thick you spread that icing on those cookies! So, I’m not gonna give you any precise numbers, ’cause they’d probably be wrong anyway. Just know that it’s mostly sugar (duh!), and enjoy those cookies in moderation, okay? Life’s too short to worry about every single calorie!
Enjoyed This Sugar Cookie Icing That Hardens Recipe?
Woohoo! You made it! I really hope you enjoyed this sugar cookie icing that hardens recipe as much as my family and I do. Seriously, it’s a game-changer, right?
If you gave this recipe a whirl, I’d absolutely *love* to hear about it! Leave a comment below and let me know how your cookies turned out. Did you try any fun flavor variations? Did you create any amazing icing designs? Spill the beans! I’m always looking for new ideas.
And hey, if you thought this recipe was a winner, give it a rating! Those little stars really help other bakers find this recipe and avoid the dreaded sticky-icing disaster. Plus, it makes me feel all warm and fuzzy inside. 🙂
Finally, if you’re feeling extra generous, share this recipe with your friends and family on social media! Click those little share buttons and spread the sugar cookie love. The more people who know about this amazing hardening icing, the better! Happy baking!
Print
Foolproof Sugar Cookie Icing That Hardens: No Mess
- Prep Time: 5 minutes
- Cook Time: 0 minutes
- Total Time: 5 minutes + hardening time
- Yield: Enough for 2-3 dozen cookies 1x
- Category: Dessert
- Method: Mixing
- Cuisine: American
- Diet: Vegetarian
Description
Create a smooth, glossy icing that hardens perfectly for decorating sugar cookies.
Ingredients
- 2 cups powdered sugar
- 3–4 tablespoons milk or water
- 1/2 teaspoon vanilla extract (optional)
- Food coloring (optional)
Instructions
- In a bowl, whisk together powdered sugar and 3 tablespoons of milk or water.
- Add more liquid, 1 teaspoon at a time, until you reach a smooth, flowing consistency.
- Stir in vanilla extract, if desired.
- Divide icing into separate bowls and add food coloring to each, if desired.
- Decorate cookies and let icing harden completely before storing.
Notes
- For a thinner consistency, add more liquid.
- For a thicker consistency, add more powdered sugar.
- Use gel food coloring for best results.
- Icing hardens best in a cool, dry environment.
Nutrition
- Serving Size: 1 cookie (with icing)
- Calories: Varies depending on thickness of icing
- Sugar: Varies depending on thickness of icing
- Sodium: Varies depending on thickness of icing
- Fat: Trace amounts
- Saturated Fat: Trace amounts
- Unsaturated Fat: 0g
- Trans Fat: 0g
- Carbohydrates: Varies depending on thickness of icing
- Fiber: 0g
- Protein: 0g
- Cholesterol: 0mg