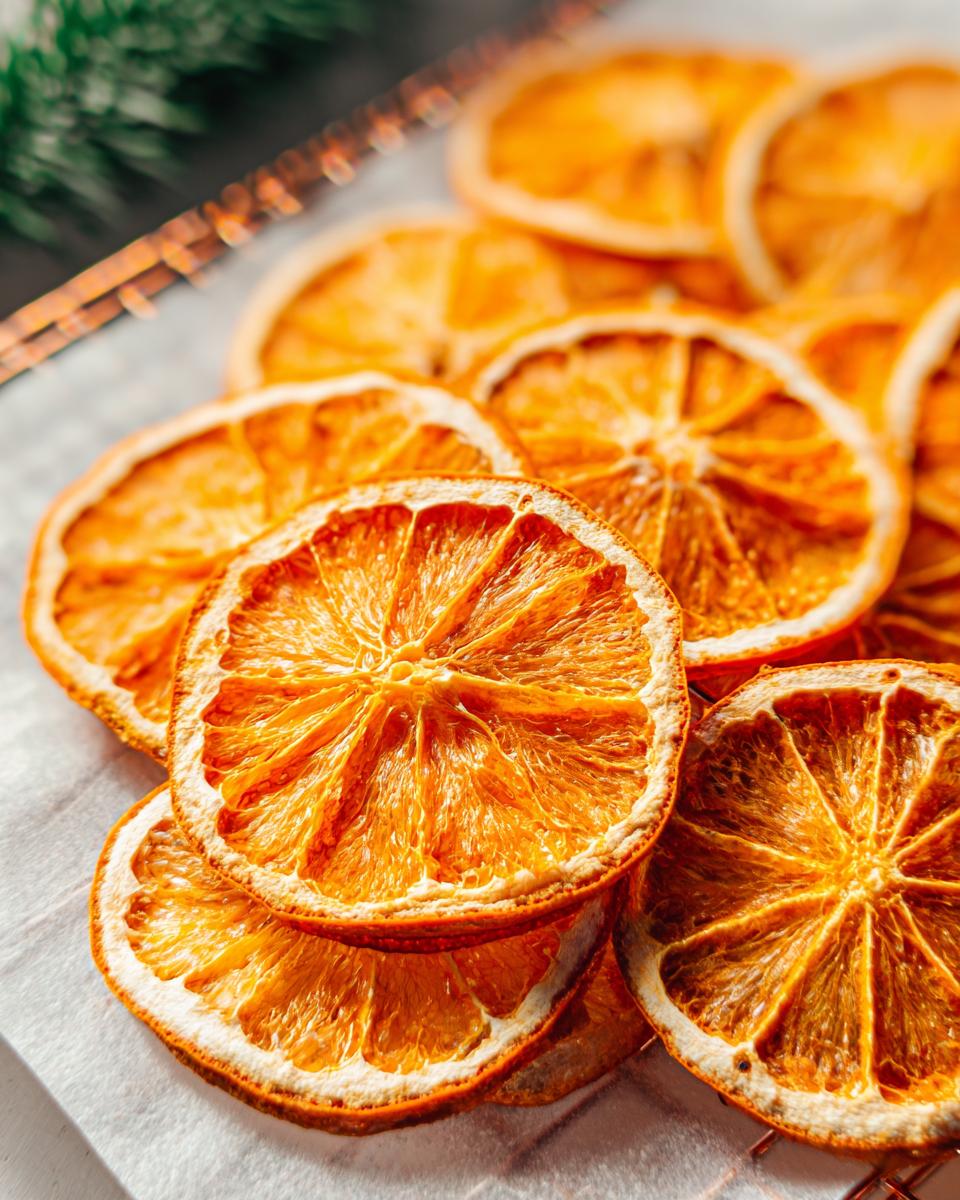
Oranges, right? They’re not just for juice! I mean, sure, I love a good glass of OJ in the morning, but did you know you can turn them into the most gorgeous *Dried Orange Slices*? Seriously, they’re like little sunbursts of flavor and decoration! I started drying oranges years ago when I wanted to make my own Christmas garlands. Now, I add them to everything – cocktails, cakes, even just floating in a glass of water for a pretty touch. And the best part? It’s SO easy! This recipe is practically foolproof, trust me. If *I* can do it, anyone can.
I’ve tried a bunch of different drying methods, and this oven-baked version is by far the simplest and gives such consistent results. Plus, making your own *Dried Orange Slices* just feels… fancier, y’know? Like you’re leveling up your home cook game!
Why You’ll Love These Dried Orange Slices
Okay, so why should you even bother making these? Let me tell you!
Simple Ingredients for Dried Orange Slices
Seriously, you only need ONE thing: oranges! How much easier (or cheaper!) can it get? You probably already have some sitting in your fruit bowl.
Versatile Uses for Dried Orange Slices
These aren’t just pretty faces, you know! Toss them in your cocktails, decorate your cakes, make a potpourri that smells AMAZING, or string ’em up for the holidays. Endless possibilities!
Beautiful and Natural Dried Orange Slices
Forget those sad, pale things from the store. Homemade *Dried Orange Slices* are vibrant, naturally beautiful, and way more impressive. Plus, you know exactly what’s in them!
Ingredients for Dried Orange Slices
You’ll need just one thing: 3 navel oranges. Make sure they’re nice and firm, okay?
How to Make Dried Orange Slices: Step-by-Step Instructions
Alright, let’s get down to business! This is where the magic happens. Don’t worry, it’s easier than you think. Just follow these steps, and you’ll have gorgeous *Dried Orange Slices* in no time!
Preparing the Oranges for Dried Orange Slices
First things first, grab those oranges! You’ll want to slice them nice and thin – about 1/8 inch is perfect. If they’re too thick, they’ll take forever to dry. I use a mandoline for super even slices, but a sharp knife works just fine. Just be careful, okay?

Next, lay those slices out on some paper towels and gently press down. This gets rid of extra juice and helps them dry faster. Arrange them on wire racks set over baking sheets. This is key! The racks let the air circulate and prevent sticking. Make sure they aren’t touching each other!
Baking the Dried Orange Slices to Perfection
Okay, this part takes a little patience, but trust me, it’s worth it! Preheat your oven to 175°F (that’s low and slow, folks!). If you have a convection oven, use it! It’ll speed things up. Pop those baking sheets in and bake for about an hour.
After an hour, flip the slices over. Then bake for another hour. And *then* flip them again for one final hour. So, three hours total, got it? But! Here’s the thing: every oven is different. Some slices might be done before others. Keep an eye on them! You want them to be dry and slightly translucent, not burnt. If they’re still plump or sticky after three hours, just keep baking them in 30-minute intervals, flipping each time, until they’re *perfectly* dry.
Cooling and Storing Your Dried Orange Slices
Once they’re done, let those *Dried Orange Slices* cool completely on the wire racks. This is important! If you store them while they’re still warm, they’ll get sticky. Nobody wants that! Once they’re cool, store them in an airtight container. They should last for several weeks… if you don’t eat them all first!
Tips for Perfect Dried Orange Slices
Want to make sure your *Dried Orange Slices* are total showstoppers? Here are a few tricks I’ve learned along the way!
First, pick the right oranges! Firm is key. You want oranges that are heavy for their size. Avoid any that feel soft or squishy. Trust me on this one!
Also, watch out for burning! That low oven temperature is important. If you notice the edges are browning too quickly, lower the heat a bit or move the baking sheets to a lower rack. Sometimes, I even crack the oven door open a tiny bit to let out some of the heat. Works like a charm!
Finally, if you want *extra* crispy *Dried Orange Slices*, try turning off the oven and leaving them inside overnight after they’re mostly dry. The residual heat will help them crisp up even more. Just don’t forget they’re in there! Oops, I’ve done that before…
Variations on Your Dried Orange Slices
Okay, so you’ve mastered the basic *Dried Orange Slices*. Now what? Let’s get a little crazy! Don’t be afraid to experiment here.
Why not try other citrus fruits? Blood oranges look amazing, and lemons and limes add a fun twist. You could even mix and match! For a festive touch, sprinkle a little cinnamon or cloves on the slices before baking. Ooh, or a *light* dusting of sugar! It’ll caramelize and make them extra delicious. Just don’t go overboard, okay?

FAQ About Making Dried Orange Slices
Got questions? I’ve got answers! Here are some of the most common things people ask me about making *Dried Orange Slices*.
How Long Do Dried Orange Slices Last?
If you store them right (airtight container, remember?), they’ll last for several weeks. But honestly? They’re usually gone way before that at my house!
Can I Make Dried Orange Slices in a Dehydrator?
Absolutely! Just follow your dehydrator’s instructions for fruit. It might even be a bit faster than using the oven. Keep an eye on them!
Why Are My Dried Orange Slices Sticky?
Sticky slices usually mean they weren’t dried long enough. Pop them back in the oven (or dehydrator!) for a bit longer. Make sure they’re *completely* cool before storing, too. That helps a ton!
Storing Your Homemade Dried Orange Slices
So, you’ve got a batch of beautiful *Dried Orange Slices*! Now, how do you keep them that way? Simple! Just pop them into an airtight container. A jar works great! Keep them in a cool, dry place, and they’ll stay crisp and delicious for weeks. But, like I said before, good luck making them last that long!
Nutritional Information for Dried Orange Slices
Just a heads-up: nutrition info can vary depending on the oranges you use, so this is just a general estimate, okay?
Enjoy Your Homemade Dried Orange Slices!
Alright, you did it! You’re now the proud owner of some gorgeous *Dried Orange Slices*! So, what are you waiting for? Go garnish something! Or, even better, snap a pic and share it! I’d love to see what you create! And hey, if you loved this recipe, leave a comment and let me know! Happy drying!
Print
Dried Orange Slices: Avoid This 3-Hour Baking Mistake
- Prep Time: 15 minutes
- Cook Time: 3 hours
- Total Time: 4 hours 15 minutes
- Yield: 36 slices 1x
- Category: Snack
- Method: Baking
- Cuisine: American
- Diet: Vegan
Description
Make your own Dried Orange Slices. Perfect for garnishing drinks, desserts, or using as festive decor.
Ingredients
- 3 navel oranges, preferably very firm
Instructions
- Preheat your oven to 175 degrees F. If available, use the convection option.
- Line two large baking pans with parchment paper and place a wire rack on top of each.
- Slice the oranges into thin slices. Aim for about 12 slices per orange, discarding the ends.
- Lay the slices between paper towels and press to absorb excess juice.
- Arrange the orange slices on the wire racks.
- Bake for 1 hour.
- Flip the slices and bake for another hour.
- Flip again and bake for 1 more hour (3 hours total).
- Check the slices. Transfer fully dried slices to a plate. Return any plump or sticky slices to the oven for 30-minute intervals, flipping each time, until fully dried.
- Cool completely and use as desired.
Notes
- Baking time may increase by 1-2 hours if using a non-convection oven or baking directly on parchment paper.
Nutrition
- Serving Size: 1 slice
- Calories: 8
- Sugar: 2g
- Sodium: 0mg
- Fat: 0g
- Saturated Fat: 0g
- Unsaturated Fat: 0g
- Trans Fat: 0g
- Carbohydrates: 2g
- Fiber: 0g
- Protein: 0g
- Cholesterol: 0mg