Halloween! Spooky movies, costumes, and, of course, the treats! But let’s be honest, sometimes the best part about Halloween isn’t just *eating* the goodies, it’s *making* them, especially with the kiddos. And that’s where these Pumpkin Patch Dirt Cups come in. They’re not just a dessert; they’re a whole activity!
I remember making dirt cups as a kid. Mom would let us crush the cookies – which, let’s face it, was the *real* reason we wanted to help. We’d argue over who got to place the gummy worms “just so.” It was messy, it was fun, and it was delicious. These Pumpkin Patch Dirt Cups bring back all those memories, but with a spooky Halloween twist. Trust me, these are the perfect way to get everyone involved in some Halloween fun, and end up with a super yummy dessert too.
So, ditch the complicated recipes this year and embrace the simple joy of these easy-peasy Pumpkin Patch Dirt Cups. They’re guaranteed to be a hit with everyone, from the little ghosts and goblins to the grown-up monsters. Let’s get spooky… and delicious!
Why You’ll Love These Pumpkin Patch Dirt Cups
Quick and Easy Halloween Dessert
Seriously, who has time for complicated desserts when you’re busy getting costumes ready? These Pumpkin Patch Dirt Cups are ridiculously easy. I’m talking, like, “blink and you’re done” easy. Minimal effort, maximum deliciousness – that’s my kind of recipe!
Fun for Kids of All Ages
Let’s be real, the best part is letting the kids decorate! Crushing cookies, arranging gummy worms… it’s pure, unadulterated fun. Don’t worry if it gets a little messy; that’s part of the charm!
Perfect for Halloween Parties
Need a crowd-pleaser for your Halloween bash? Look no further! These Pumpkin Patch Dirt Cups are always a hit. They’re cute, they’re festive, and they’re easy to make in big batches. Plus, everyone loves a good dirt cup!
Ingredients for Your Pumpkin Patch Dirt Cups
Pudding and Spice: The Base of Your Pumpkin Patch Dirt Cups
Okay, so for that yummy, creamy base, you’ll need one of those 3.9-ounce boxes of instant chocolate pudding mix – Jell-O brand works great. Then, grab your milk (I usually use regular milk, but whatever you have on hand is fine!) and a teaspoon of pumpkin pie spice. Don’t skip the spice; it’s what makes these scream “Halloween!”
Cookies and Cream: The Crunchy Component in Pumpkin Patch Dirt Cups
Now for the “dirt!” You’re gonna want one of those 14.3-ounce packages of chocolate sandwich cookies – Oreos, basically. Crush ’em up good! And to make it extra creamy and delicious, snag one of those 8-ounce containers of frozen whipped topping, like Cool Whip. Make sure it’s thawed!
Candy Toppings: Decorating Your Pumpkin Patch Dirt Cups
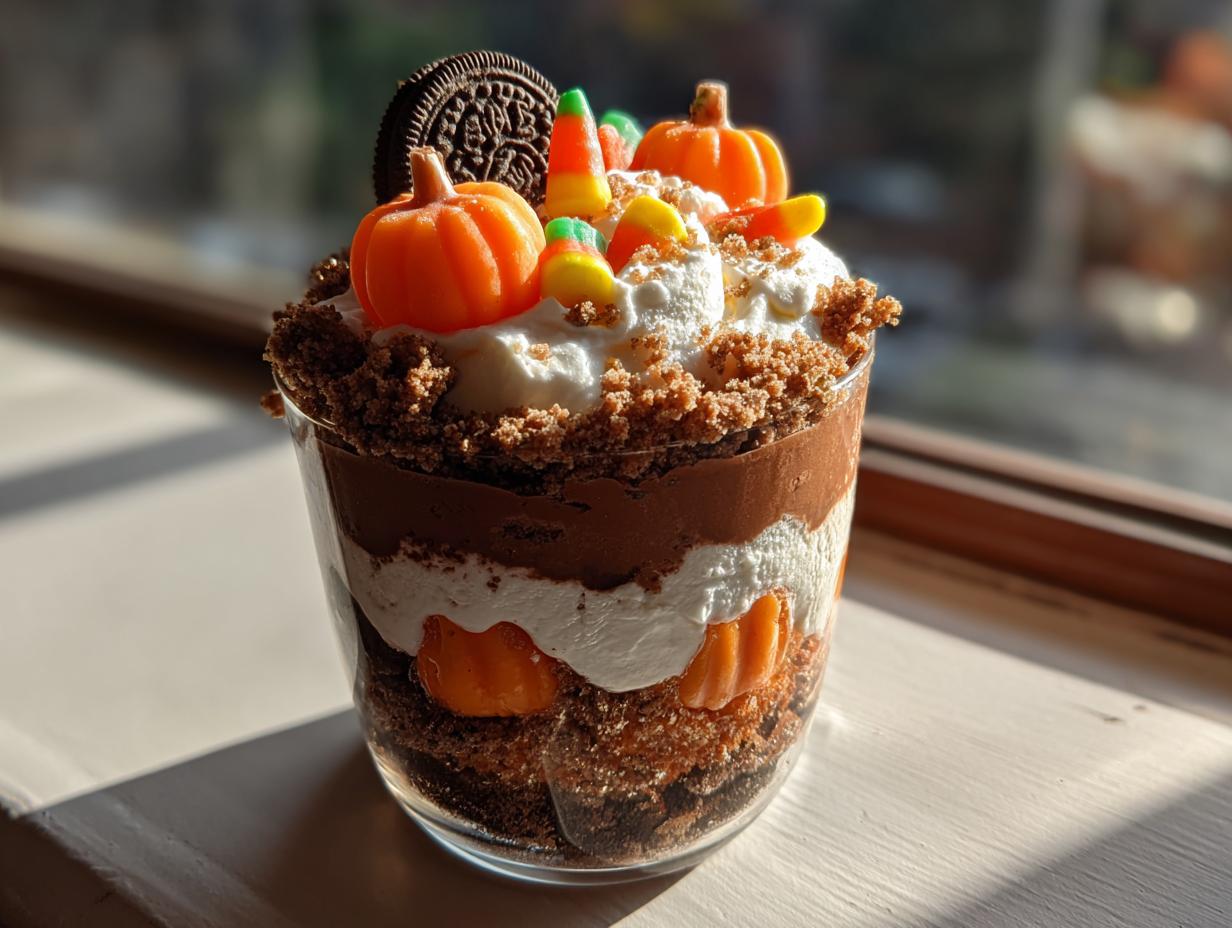
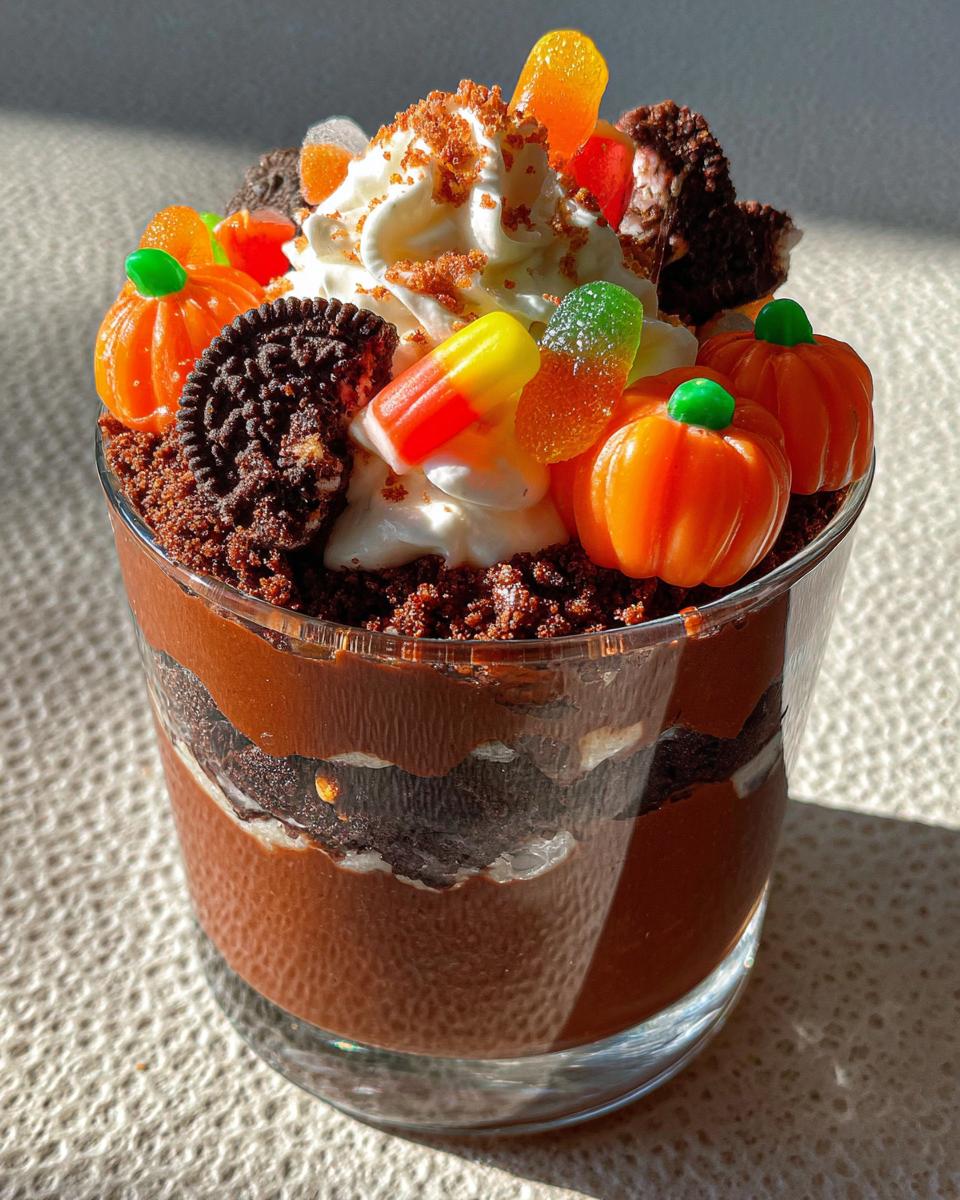
This is where the fun *really* begins! You’ll need some candy pumpkins (those little orange ones are perfect) and gummy worms. I mean, what’s a dirt cup without gummy worms crawling around? Feel free to add any other spooky candies you like!
How to Make Pumpkin Patch Dirt Cups
Preparing the Pudding for Pumpkin Patch Dirt Cups
Alright, first things first, grab a bowl – any bowl will do, honestly! Dump in that chocolate pudding mix, pour in the milk, and then sprinkle in that pumpkin pie spice. Now, whisk it all together for a good 2 minutes. Don’t skimp on the whisking; you want it nice and smooth! Then, just let it sit for about 5 minutes to let it soft-set. It’ll thicken up a bit, trust me!
Assembling Your Pumpkin Patch Dirt Cups
Okay, here comes the fun part! Gently fold in those crushed cookies and the whipped topping into the pudding mixture. Don’t overmix it; you want to keep some of that “dirt” texture. Just fold it until it’s all combined.
Decorating Your Pumpkin Patch Dirt Cups
Now, grab some clear cups – plastic or glass, whatever you have! Spoon that yummy dirt mixture into the cups. Don’t worry about making them perfect; they’re supposed to look like a messy pumpkin patch! Then, take those candy pumpkins and gummy worms and go wild! Arrange them however you like. My favorite part is making the gummy worms look like they’re crawling out of the dirt!
Chilling and Serving Your Pumpkin Patch Dirt Cups
Pop those bad boys into the fridge for a bit – at least 30 minutes, but longer is even better. This lets everything set up and get nice and cold. And that’s it! Serve ’em up and watch everyone’s faces light up. Seriously, these Pumpkin Patch Dirt Cups are always a hit!
Tips for the Best Pumpkin Patch Dirt Cups
Get Ahead: Chill Your Pumpkin Patch Dirt Cups
Okay, listen up! Don’t even *think* about skipping the chilling time. It’s super important! Letting those Pumpkin Patch Dirt Cups chill in the fridge for at least 30 minutes (or even longer!) really lets those flavors meld together. Plus, it gives the pudding a chance to set up properly. Nobody wants a soupy dirt cup!
Crushing the Cookies for Perfect Pumpkin Patch Dirt Cups
Alright, so you *could* just throw the cookies in a bag and whack ’em with a rolling pin… but trust me, you’ll get way better results if you use a food processor (if you have one!). Pulse them until they’re nice and crumbly – not too fine, you still want some texture! If you’re going the bag route, try using a meat mallet for more even crushing.

Creative Candy Placement for Festive Pumpkin Patch Dirt Cups
Okay, this is where you can really let your inner artist shine! Don’t just plop those candy pumpkins on top! Try burying some of them halfway in the “dirt” for a more realistic pumpkin patch look. And get creative with those gummy worms! Make them look like they’re slithering out from under the pumpkins, or even have them “climbing” up the side of the cup. It’s all about the details!
Variations for Your Pumpkin Patch Dirt Cups
Different Pudding Flavors in Pumpkin Patch Dirt Cups
Okay, so chocolate pudding is classic, but don’t be afraid to mix it up! Vanilla pudding works great, especially if you want a lighter flavor. Or, if you’re feeling fancy, try white chocolate pudding! It’ll give your Pumpkin Patch Dirt Cups a super creamy, almost dreamy taste. Wow!
Cookie Swaps for Unique Pumpkin Patch Dirt Cups
Not a fan of chocolate sandwich cookies? No problem! Graham crackers are a fantastic alternative. They give a more subtle, almost cinnamon-y flavor. Or, if you’re feeling adventurous, try using some peanut butter cookies! Just be careful if anyone has allergies!
Candy Alternatives for Your Pumpkin Patch Dirt Cups
Candy pumpkins and gummy worms are cute, but the sky’s the limit here! Candy corn is a classic Halloween choice. Chocolate chips add a nice chocolatey crunch. Or, if you really want to get spooky, try using gummy spiders or eyeballs! Oops!
Frequently Asked Questions About Pumpkin Patch Dirt Cups
Can I Prepare Pumpkin Patch Dirt Cups in Advance?
Absolutely! In fact, I almost *recommend* it. Making these Pumpkin Patch Dirt Cups a few hours ahead of time actually helps the flavors meld together even more. Just assemble everything, pop ’em in the fridge, and they’ll be ready to go when you are! They’ll keep well for up to 24 hours, but honestly, they’re usually gone way before then!
What are Good Substitutes for Candy Pumpkins in Pumpkin Patch Dirt Cups?
So, you went to the store and they’re OUT of candy pumpkins? Don’t panic! You can use pretty much any Halloween candy you like! Candy corn is a great option, or even those little peanut butter cups. Get creative! You could even use some orange-colored sprinkles for a little extra pumpkin-y flair. The point is to make ’em festive and fun!
Is it Possible to Use Sugar-Free Pudding Mix in Pumpkin Patch Dirt Cups?
Yep, you totally can! If you’re trying to cut down on sugar, sugar-free pudding mix works just fine in these Pumpkin Patch Dirt Cups. Just keep in mind that it might change the flavor and texture *slightly*. It might not be quite as rich and creamy as the regular stuff, but it’ll still be delicious… and a little bit healthier!
Storing and Reheating Your Pumpkin Patch Dirt Cups
Proper Storage for Pumpkin Patch Dirt Cups
Got leftovers? Lucky you! Just pop a lid on those Pumpkin Patch Dirt Cups (or cover ’em with plastic wrap) and stick ’em in the fridge. They’ll keep for a day or two, but honestly, they’re so good, they probably won’t last that long!

Maintaining Freshness of Your Pumpkin Patch Dirt Cups
The biggest enemy of these dirt cups is sogginess. To keep ’em from getting too mushy, try not to assemble them *too* far in advance. And if you know you’re going to have leftovers, maybe hold off on adding the gummy worms until right before serving. They tend to get a little weird in the fridge.
Estimated Nutritional Information for Pumpkin Patch Dirt Cups
Okay, so just a heads up: all those candy pumpkins and cookies mean these Pumpkin Patch Dirt Cups are definitely a treat! Each cup is roughly 350 calories, but hey, it’s Halloween! Enjoy!
Share the Halloween Fun
Rate this Pumpkin Patch Dirt Cups Recipe
Hey, if you loved these Pumpkin Patch Dirt Cups as much as my little goblins did, I’d *love* it if you gave the recipe a rating! It helps other spooky cooks find this recipe!
Share Your Pumpkin Patch Dirt Cups Creations
Made your own batch of Pumpkin Patch Dirt Cups? Awesome! Snap a pic and share it on social media! Tag me – I wanna see all your creative candy arrangements! Happy haunting (and baking)!
Print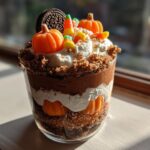
Delightful Pumpkin Patch Dirt Cups in Just 30 Minutes
- Prep Time: 15 minutes
- Cook Time: 0 minutes
- Total Time: 20 minutes
- Yield: 6 servings 1x
- Category: Dessert
- Method: No-Bake
- Cuisine: American
- Diet: Vegetarian
Description
Pumpkin Patch Dirt Cups are a fun and festive Halloween dessert.
Ingredients
- 1 package (3.9 ounces) instant chocolate pudding mix
- 3 cups cold milk
- 1 teaspoon pumpkin pie spice
- 1 package (14.3 ounces) chocolate sandwich cookies, crushed
- 1 container (8 ounces) frozen whipped topping, thawed
- Candy pumpkins
- Gummy worms
Instructions
- In a bowl, whisk pudding mix, milk, and pumpkin pie spice for 2 minutes.
- Let stand until soft-set, about 5 minutes.
- Fold in crushed cookies and whipped topping.
- Spoon into clear cups.
- Garnish with candy pumpkins and gummy worms.
- Refrigerate until serving.
Notes
- You can use sugar-free pudding mix to reduce sugar content.
- Feel free to add other Halloween candies.
Nutrition
- Serving Size: 1 cup
- Calories: 350
- Sugar: 30g
- Sodium: 250mg
- Fat: 18g
- Saturated Fat: 10g
- Unsaturated Fat: 6g
- Trans Fat: 0g
- Carbohydrates: 45g
- Fiber: 2g
- Protein: 4g
- Cholesterol: 5mg