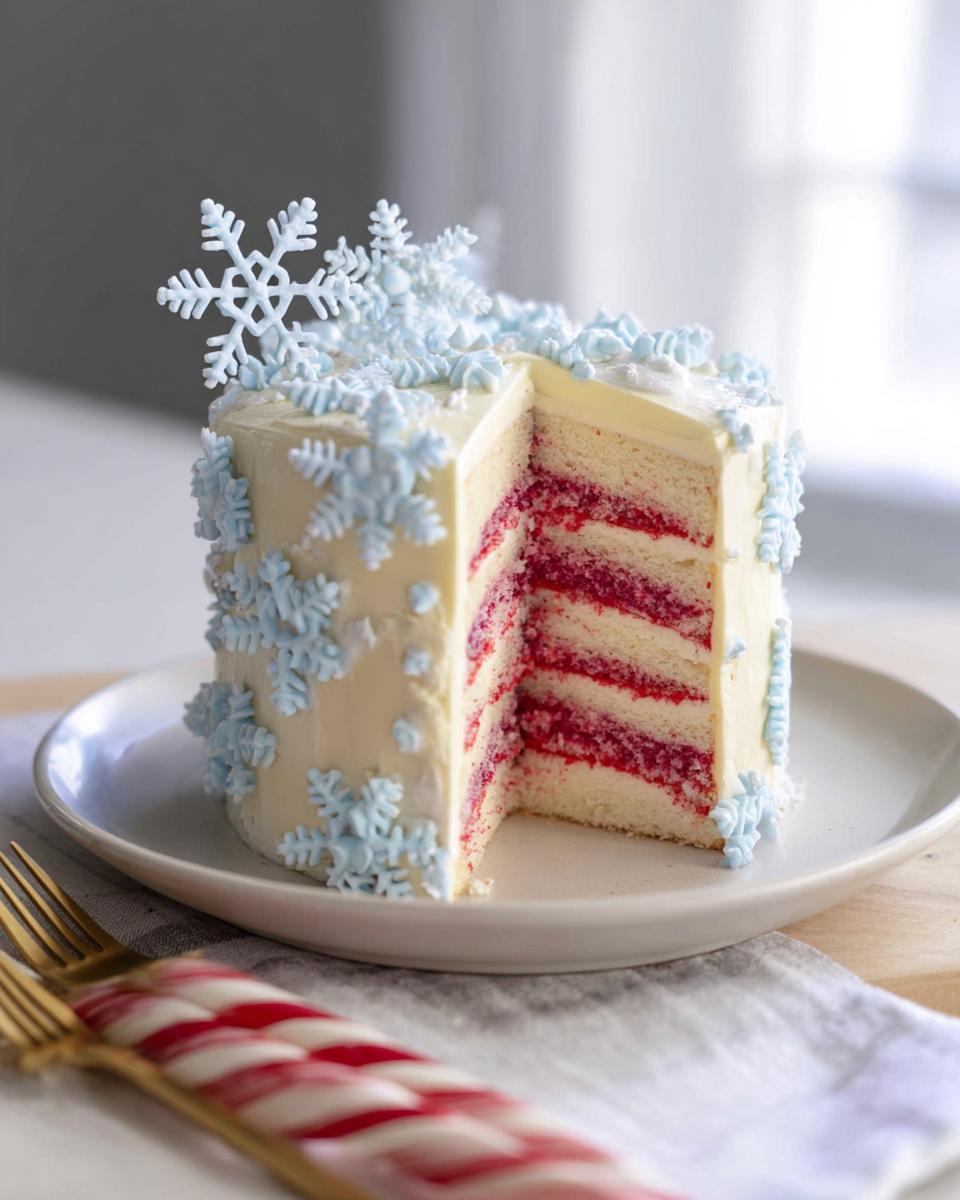
Isn’t there just something magical about winter? The way the snow glitters, the cozy nights in… and all the baking! My favorite part? Definitely the snowflakes. They’re all so unique, just like this Snowflake Swirl Cake I’m about to share with you. It’s got layers of pepperminty goodness that’ll make you feel like you’re in a winter wonderland.
I started making this Snowflake Swirl Cake a few years ago for our annual holiday party, and it’s been a hit ever since! The peppermint gives it such a festive kick, and honestly, look at it!  Those candy melt snowflakes? Total showstopper. Trust me, this cake isn’t just delicious; it’s a work of art. Perfect for impressing your friends and family (or, you know, just yourself!).
Why You’ll Love This Snowflake Swirl Cake
The Perfect Holiday Dessert: Snowflake Swirl Cake
Seriously, is there anything more festive? This Snowflake Swirl Cake just screams “holidays!” My family practically begs me to make it every year. It’s perfect for Christmas, New Year’s, or honestly, any chilly day you want to feel a little extra special.
Snowflake Swirl Cake: A Flavorful Delight
Okay, let’s talk flavor. That peppermint cake? Wow! It’s not overpowering, just a nice little zing. And paired with the buttercream? Forget about it! It’s a match made in dessert heaven. Trust me, you won’t be able to stop at just one slice!
Ingredients for Your Snowflake Swirl Cake
Alright, let’s get down to the good stuff – the ingredients! Don’t worry, it looks like a lot, but I promise it’s worth it. I’ve broken it down into sections to make it super easy. Just make sure you’ve got everything measured out before you start, okay? It’ll save you a headache later, trust me!
Cake Ingredients for the Snowflake Swirl Cake
- 1 2/3 cups all-purpose flour – Don’t pack it in!
- 1 cup sugar – Granulated, plain and simple!
- 1/4 teaspoon baking soda – Gotta get that rise!
- 1 teaspoon baking powder – Double the rise, double the fun!
- 3/4 cup unsalted butter, room temperature – Seriously, ROOM temperature. Soft, but not melted!
- 3 egg whites – Just the whites, save the yolks for later!
- 3 teaspoons vanilla extract – The good stuff, not the imitation!
- 1/2 cup sour cream – Adds a little tang and keeps it moist!
- 1/2 cup whole milk – Whole is best for richness!
- 1 teaspoon peppermint extract – Adjust to your taste, but don’t overdo it!
Italian Buttercream Ingredients for the Snowflake Swirl Cake
- 4 large eggs – Gotta have those eggs!
- 1 1/3 cup sugar – For that silky sweetness!
- Pinch of kosher salt – Just a pinch to balance it all out!
- 16 oz unsalted butter, cut into 1-inch pieces – Again, room temperature!
- 1 teaspoon vanilla extract – Can’t hurt to add more vanilla!
- 1/4 teaspoon cream of tartar – Helps stabilize the meringue!
- Blue food coloring – Gel is best, trust me!
Buttercream Ingredients for the Snowflake Swirl Cake
- 1 lb confectioner’s sugar – Sifted is always a good idea!
- 1 cup unsalted butter, room temperature – Are you sensing a theme here?
- 3 tablespoons heavy whipping cream – For extra fluffiness!
- 3 teaspoons vanilla extract – You know the drill!
- Red food coloring – Gel, again!
Snowflake Ingredients for the Snowflake Swirl Cake
- ⅔ cup candy melts – White or light blue, whatever floats your boat!
- Parchment paper – Essential for easy snowflake removal!
Equipment Needed to Make Snowflake Swirl Cake
Essential Tools for Your Snowflake Swirl Cake
Okay, so you’ve got your ingredients, right? Now, let’s talk tools! You’ll need your trusty cake pans (6-inch are my fave!), a stand mixer (or a really strong arm!), piping bags (a must for those pretty swirls!), and parchment paper. Oh, and don’t forget an offset spatula for smoothing that buttercream. Trust me, you got this!
How to Prepare Snowflake Swirl Cake: Step-by-Step Instructions
Okay, here we go! This is where the magic happens. Don’t be intimidated, okay? I’ve broken it down into super easy steps. Just follow along, and you’ll have a gorgeous Snowflake Swirl Cake in no time! And hey, even if it’s not *perfect*, it’ll still taste amazing!
Baking the Perfect Snowflake Swirl Cake Layers
First things first, preheat your oven to 350 degrees F (175 degrees C). While that’s heating up, butter and line the bottom of your three 6-inch cake pans with parchment paper. This is KEY, trust me, or you’ll be crying when you try to get the cakes out! Then, in a big bowl, whisk together all the dry ingredients. In another bowl, mix all your wet ingredients. Now, slowly add the wet to the dry, mixing until *just* combined. Divide the batter evenly between your pans and bake for around 30 minutes. You’ll know they’re done when a toothpick inserted into the center comes out clean. Let them cool completely before frosting – super important!
Making the Italian Buttercream for the Snowflake Swirl Cake
Alright, this one’s a little trickier, but trust me, it’s worth it! First, you’re gonna beat those egg whites with the salt and cream of tartar until soft peaks form. Then, in a saucepan, combine the sugar and water and cook until it reaches 235-240F (113-116C) on a candy thermometer. Careful, it’s HOT! Slowly drizzle that hot sugar syrup into the egg whites while the mixer is running. Keep mixing until the meringue is cool. Then, add the room-temperature butter, one tablespoon at a time, until it’s all combined and silky smooth. It might look curdled at first, but don’t panic! Just keep mixing, and it’ll come together. Finally, add the vanilla and divide the buttercream into batches, coloring each with different shades of blue. So pretty!
Preparing the Buttercream for the Snowflake Swirl Cake
This is the easy part! Just whip that butter with a paddle attachment for about 5 minutes until it’s light and fluffy. Then, slowly add the confectioner’s sugar, followed by the heavy cream and vanilla. Beat until it’s all smooth and dreamy. Divide the buttercream, coloring one batch red and leaving the other white.
Creating the Candy Melt Snowflakes for the Snowflake Swirl Cake
Melt those candy melts in the microwave in 30-second intervals, stirring in between, until smooth. Be careful not to overheat them! Transfer the melted candy to a piping bag, snip off the tip, and pipe snowflakes onto parchment paper. Get creative! Let them harden completely. You can pop ’em in the fridge to speed things up.
Assembling Your Stunning Snowflake Swirl Cake
Okay, the grand finale! Pipe the red and white buttercream between each cake layer. Then, pipe the blue buttercream onto the cake, starting with the lightest shade at the bottom and graduating to the darkest at the top. Smooth it all out with an offset spatula. Finally, gently attach those candy melt snowflakes all over the cake. Ta-da! You did it! Now, stand back and admire your masterpiece (and maybe snap a few photos for Instagram!).
Tips for Snowflake Swirl Cake Success
Want to make sure your Snowflake Swirl Cake is a total winner? I’ve got a few tricks up my sleeve! These are the little things that’ll take your cake from “good” to “OMG, this is amazing!” Trust me, these are game-changers!
Achieving Perfect Cake Layers for Your Snowflake Swirl Cake
Okay, so nobody wants a cake with a big ol’ dome in the middle, right? My secret? Cake strips! You soak ’em in water and wrap ’em around your cake pans before baking. They help the cakes bake evenly, so you get nice, flat layers. Also, don’t overmix the batter! That can lead to tough cakes. Just mix until everything’s combined, then stop!
Mastering the Buttercream for Your Snowflake Swirl Cake
Buttercream can be tricky, I know! The key is room-temperature butter. Seriously, it needs to be soft but not melted. Also, make sure your meringue is completely cool before adding the butter for the Italian buttercream. If it’s too warm, the buttercream will melt and be a soupy mess! And don’t be afraid to keep mixing if it looks curdled. Sometimes it just needs a little encouragement to come together.
Working with Candy Melts for Your Snowflake Swirl Cake
Candy melts are so cute, but they can be a pain! The biggest thing? Don’t overheat them! Seriously, microwave them in short bursts and stir, stir, stir! If they seize up and get all thick and clumpy, add a tiny bit of shortening. But only a tiny bit! And make sure your snowflakes are completely hardened before you try to peel them off the parchment. Otherwise, they’ll break. Oops, I’ve been there!
Ingredient Notes and Substitutions for Snowflake Swirl Cake
Okay, so maybe you’re missing an ingredient or just wanna switch things up a bit? No problem! Baking’s all about experimenting, right? Here’s the lowdown on some easy swaps you can make in this Snowflake Swirl Cake recipe. Just remember, it might change the flavor or texture a little, but hey, that’s part of the fun!
Cake Flour Substitutions for Snowflake Swirl Cake
Don’t have cake flour on hand? No stress! Just use all-purpose flour, but take out two tablespoons and replace them with cornstarch. Sounds weird, I know, but trust me, it works! It’ll give you that nice, tender crumb you’re looking for. Or, if you’re feeling fancy, you can use pastry flour. It’s kinda like cake flour’s cousin!
Extract Variations for Snowflake Swirl Cake
Not a fan of peppermint? (Gasp!) Okay, okay, I get it. You can totally swap it out for other extracts. Vanilla extract is always a safe bet. Or, if you wanna get a little wild, try almond extract or even lemon extract. Just use the same amount as the peppermint, and you’re good to go! You could even skip the extract altogether and just add a little extra vanilla. Your cake, your rules!
Frequently Asked Questions About Snowflake Swirl Cake
Got questions about this Snowflake Swirl Cake? I figured you might! Baking can be tricky, so don’t worry, I’m here to help! Here are a few of the most common questions I get asked. Hopefully, this clears things up, but if not, just leave a comment below, and I’ll do my best to answer!
Can I Make Snowflake Swirl Cake Ahead of Time?
Absolutely! In fact, I often think it tastes *better* the next day! You can bake the cake layers a day or two in advance, wrap them tightly in plastic wrap, and store them at room temperature or even in the fridge. The buttercream can also be made ahead of time and stored in an airtight container in the fridge. Just let it come to room temperature and re-whip it before using. Assembling the whole shebang a day ahead is totally fine, too! Just store it in the fridge.
How Do I Prevent My Snowflake Swirl Cake From Drying Out?
Nobody wants a dry cake, right? The key is moisture! That sour cream in the cake batter really helps. Also, don’t overbake it! Keep an eye on it, and take it out as soon as a toothpick comes out clean. And when you’re storing the cake, make sure it’s wrapped tightly or in an airtight container. That buttercream acts as a barrier, too, so don’t skimp on it!
What’s the Best Way to Store Snowflake Swirl Cake?
If you’re not serving the cake right away, store it in the fridge. The buttercream can get a little melty at room temperature, especially if it’s warm. Just make sure it’s covered, so it doesn’t dry out. And when you’re ready to eat it, let it sit at room temperature for about 30 minutes to soften up a bit. Trust me, it’ll be worth the wait!
Storing and Reheating Your Snowflake Swirl Cake
Okay, so you’ve made this amazing Snowflake Swirl Cake, and somehow, you have leftovers (I know, shocking!). Don’t worry, I’ve got you covered on how to keep it fresh and delicious!
Proper Storage for Snowflake Swirl Cake
Honestly, the fridge is your best friend here. That buttercream is happiest when it’s chilled! Just pop the cake (covered, of course!) in the fridge, and it’ll be good for about 3-4 days. Make sure it’s not near anything smelly, though, or your cake might end up tasting like onions (yuck!).
Reheating Instructions for Snowflake Swirl Cake
Okay, so you *can* reheat cake, but honestly, I think this Snowflake Swirl Cake is best enjoyed cold or at room temperature. Reheating might dry it out a bit, and nobody wants that! But if you’re really set on it, try a tiny slice in the microwave for like, 10 seconds. But seriously, just try it cold first!
Nutritional Information for Snowflake Swirl Cake
Okay, so let’s be real, this Snowflake Swirl Cake is a treat! The numbers below are just an estimate, but wow, is it worth it!
Rate this Snowflake Swirl Cake Recipe
So, did you love it? I hope so! Leave a comment below and let me know what you think! And hey, don’t forget to rate the recipe and share it with your friends!
Print
Snowflake Swirl Cake: Deliciously Decadent & Unforgivable
- Prep Time: 25 minutes
- Cook Time: 35 minutes
- Total Time: 1 hour
- Yield: 10 servings 1x
- Category: Dessert
- Method: Baking
- Cuisine: American
- Diet: Vegetarian
Description
Create a stunning Snowflake Swirl Cake with layers of peppermint-infused cake, Italian buttercream, and delicate candy melt snowflakes.
Ingredients
- FOR THE CAKE:
- 1 2/3 cups all-purpose flour
- 1 cup sugar
- 1/4 teaspoon baking soda
- 1 teaspoon baking powder
- 3/4 cup unsalted butter, room temperature
- 3 egg whites
- 3 teaspoons vanilla extract
- 1/2 cup sour cream
- 1/2 cup whole milk
- 1 teaspoon peppermint extract
- FOR THE ITALIAN BUTTERCREAM:
- 4 large eggs
- 1 1/3 cup sugar
- Pinch of kosher salt
- 16 oz unsalted butter, cut into 1-inch pieces
- 1 teaspoon vanilla extract
- 1/4 teaspoon cream of tartar
- Blue food coloring
- FOR THE BUTTERCREAM:
- 1 lb confectioner’s sugar
- 1 cup unsalted butter, room temperature
- 3 tablespoons heavy whipping cream
- 3 teaspoons vanilla extract
- Red food coloring
- FOR THE SNOWFLAKES:
- ⅔ cup candy melts
- Parchment paper
Instructions
- FOR THE CAKE: Preheat oven to 350 degrees F.
- Butter and paper three 6-inch cake pans.
- Sift and mix dry ingredients in a large bowl.
- Beat the wet ingredients together in a medium bowl.
- Add wet to dry ingredients and mix until combined.
- Divide the mixture evenly into the cake pans.
- Bake for about 30 minutes until the centers are springy to the touch.
- Let cool completely.
- FOR THE ITALIAN BUTTERCREAM: Beat the egg whites, salt, and cream of tartar. Slowly add in 1/3 cup of sugar and continue beating until soft peaks form. In a saucepan, add the remaining sugar and 1/3 cup water. Stir until sugar melts and becomes clear. Maintain at medium-high heat until temperature reads 235-240F.
- Drizzle the sugar into the mixer immediately. Run mixer until meringue is cool/tepid. Add room temperature butter into running mixer one tablespoon piece at a time.
- Add the vanilla. Beat until butter is combined and mixture has reached a silky consistency.
- Create a gradient by adding different amounts of blue food coloring to remaining buttercream batches. Transfer each color to its own piping bag. Pipe the ombre color and smooth with an offset spatula.
- FOR THE BUTTERCREAM: Whip the butter for about 5 minutes using a paddle attachment.
- Beat in the confectioner’s sugar slowly.
- Add the cream and vanilla. Beat until you have an even, fluffy consistency.
- Transfer a white batch to a piping bag. Add red food coloring to another batch and transfer to a piping bag. Snip off the tips of both and add to a larger piping bag. Pipe a spiral between each layer.
- Pipe and smooth a crumb coat with excess.
- FOR THE SNOWFLAKES: Melt candy melts in the microwave.
- Transfer to a piping bag and snip off the tip.
- Pipe snowflakes onto a piece of parchment paper.
- FOR THE ASSEMBLY: Pipe the red and white buttercream between each cake layer.
- Pipe white, then blue buttercream, lightest to darkest starting from the bottom.
- Smooth with an offset spatula.
- Add snowflakes.
Notes
- Use cake strips for even baking.
- Ensure butter is at room temperature for best results.
- Cool meringue before adding butter.
Nutrition
- Serving Size: 1 slice
- Calories: 650
- Sugar: 70g
- Sodium: 150mg
- Fat: 35g
- Saturated Fat: 22g
- Unsaturated Fat: 10g
- Trans Fat: 1g
- Carbohydrates: 80g
- Fiber: 1g
- Protein: 5g
- Cholesterol: 100mg