

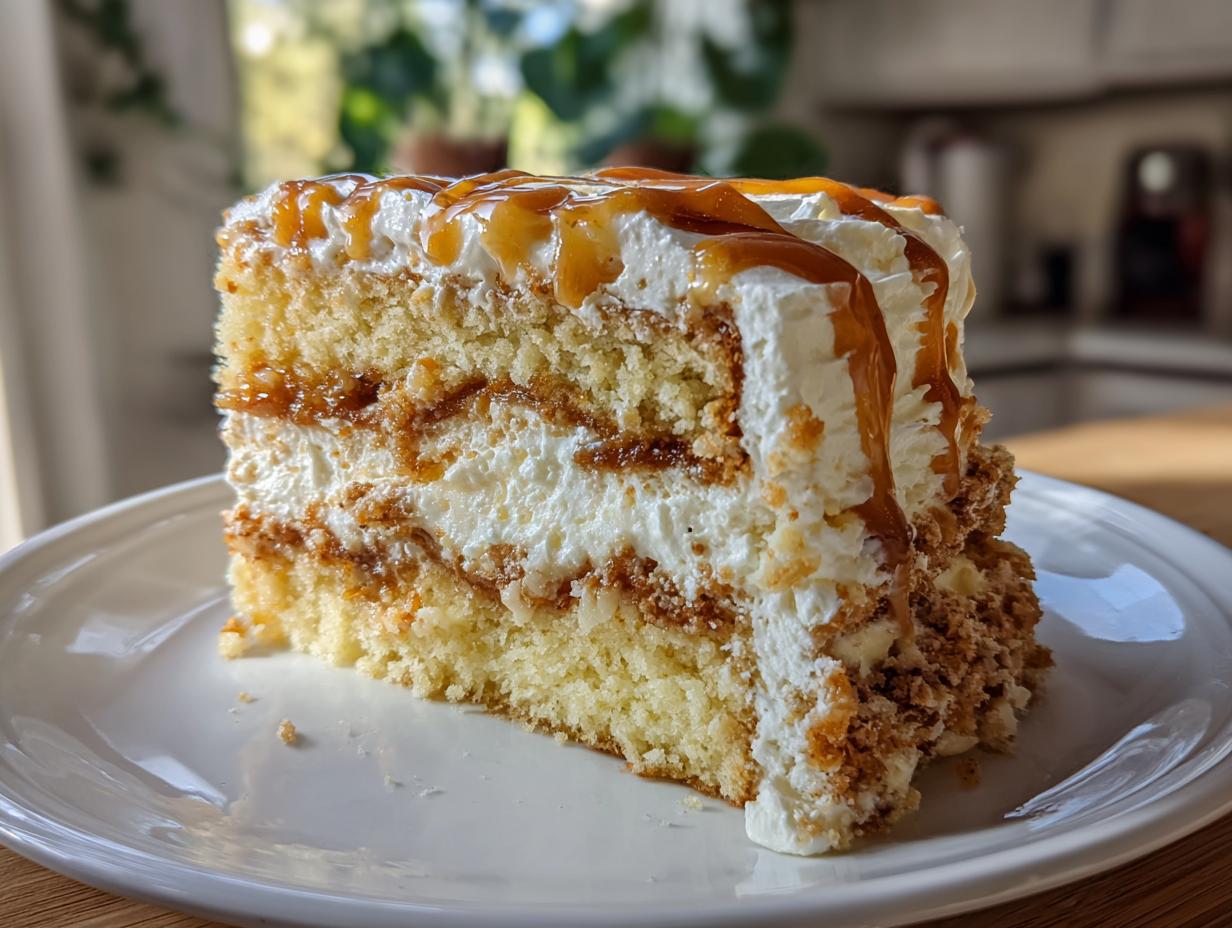
Okay, let’s be real – who *doesn’t* love a Butterfinger? Seriously, that crispy, peanut-buttery, chocolatey goodness? It’s basically the perfect candy bar. I remember when I was a kid, my grandma would always have a bowl of them out, and sneaking one (or three!) was the highlight of my day. So, naturally, I had to figure out how to turn that iconic flavor into a cake. And trust me, this Butterfinger Cake? It’s a total game-changer. It’s ridiculously easy to make, it’s always a crowd-pleaser, and it captures that amazing Butterfinger taste perfectly. This is my go-to recipe when I need a dessert that’s guaranteed to disappear fast!

Why You’ll Love This Butterfinger Cake
Seriously, get ready to fall in love. This cake is just…amazing. Here’s why:
Quick and Easy Butterfinger Cake Recipe
I’m all about easy, and this cake definitely delivers! It starts with a cake mix, so you’re already halfway there. Plus, it’s mostly just mixing and dumping – my kind of baking!
Decadent Butterfinger Cake Flavor
Oh. My. Goodness. The Butterfinger flavor just explodes in your mouth. The crushed candy bars in the cake and on top? Genius, if I do say so myself! It’s peanut buttery, chocolatey, and perfectly sweet.
Perfect Butterfinger Cake for Any Occasion
Potlucks? Covered. Birthday parties? Nailed it. Just need a little something sweet on a Tuesday night? This Butterfinger Cake is your answer! It’s seriously perfect for *any* excuse to celebrate (or, you know, just eat cake!).
Ingredients for Your Butterfinger Cake
Alright, let’s gather our goodies! You probably have a lot of these things already. Nothing too fancy here, I promise! I’ve listed everything out below, but you can also jump straight to the full recipe if you’re ready to get baking!
Essential Butterfinger Cake Components
Cake Mix
Grab 1 box of yellow cake mix. Any brand works, whatever you’ve got in the pantry!
Pudding
You’ll need 1 (3.4 ounce) package of instant vanilla pudding mix. This is the secret weapon for a super moist cake!
Liquid
Just 1 cup of regular ol’ milk. I usually use 2%, but honestly, whatever milk you have on hand is totally fine.
Fat
Melted butter! You’ll need 1/2 cup. I usually just nuke it in the microwave, but do whatever works for you. Careful, it splatters!
Eggs
Gotta have eggs! 4 large ones, to be exact.
Flavor Enhancer
A teaspoon of vanilla extract. Don’t skip this! It really brings out the flavors.
Candy
The star of the show! 1 (10 ounce) bag of Butterfinger candy bars, crushed. I like to give them a good whack in a Ziploc bag with a rolling pin. It’s very therapeutic!
Topping
Whipped topping! 1 (16 ounce) container. Cool Whip is my go-to, but use whatever you like.
Sauce
Caramel sauce! About 1/4 cup. Store-bought is totally fine. Or, if you’re feeling ambitious, you can make your own!
How to Make Butterfinger Cake: Step-by-Step Instructions
Okay, let’s get down to business! This is where the magic happens. Don’t worry, it’s super easy. Just follow along, and you’ll have a killer Butterfinger Cake in no time!
Preparing to Bake Your Butterfinger Cake
Preheat and Prep
First things first: crank up that oven to 350 degrees F (175 degrees C). While it’s heating up, grease and flour a 9×13 inch baking pan. I like to use a little bit of shortening to grease it, then dust it with flour. This way, the cake slides right out, no sticking!
Mixing the Butterfinger Cake Batter
Now, grab a large bowl (or your stand mixer, if you’re fancy!). Dump in the cake mix, pudding mix, milk, melted butter, eggs, and vanilla extract. Beat it all together until it’s well combined. Don’t overmix, just until everything’s smooth. Then, stir in *half* of those crushed Butterfinger candy bars. Save the other half for topping!

Baking and Cooling Your Butterfinger Cake
Baking Instructions
Pour that yummy batter into your prepared pan and pop it in the oven. Bake for 30-35 minutes. To check if it’s done, stick a wooden skewer into the center. If it comes out clean, you’re good to go! If not, give it a few more minutes.
Cooling Process
This is important: let the cake cool *completely*. I know, it’s tempting to dive in, but trust me, you need to let it cool. Otherwise, the whipped topping will melt right off. I usually let it cool on a wire rack for at least an hour.
Assembling Your Decadent Butterfinger Cake
Adding the Toppings
Once the cake is completely cool, poke holes all over it with a fork. This helps the caramel soak in. Then, spread that whipped topping all over the cake in an even layer. Sprinkle the remaining crushed Butterfinger candy bars on top of the whipped topping. Finally, drizzle with caramel sauce. Don’t be shy!
Chilling Time
Now for the hardest part: refrigerate the cake for at least 30 minutes before serving. This lets everything set up and the flavors meld together. I usually try to chill it for longer if I can, but 30 minutes is the bare minimum!
Tips for the Best Butterfinger Cake
Want to take your Butterfinger Cake from “good” to “OMG”? Here are a few tricks I’ve learned along the way!
Achieving the Perfect Butterfinger Cake Crumb
Moist cake is happy cake! The pudding mix is key, but don’t overbake it! Start checking for doneness around 30 minutes. And hey, if you’re feeling fancy, try using brown butter instead of regular melted butter. It adds a nutty depth that’s just incredible.
Maximizing Butterfinger Flavor in Your Cake
Okay, this is serious: use *real* Butterfingers. No generic candy bars allowed! Also, don’t be afraid to be generous with the crushed candy. The more, the merrier, right? For an extra boost, you could even add a Butterfinger-flavored extract to the batter (if you can find it!).
Butterfinger Cake Presentation Ideas
Make it pretty! A simple caramel drizzle is classic, but you could also add some chopped peanuts, a sprinkle of sea salt (trust me!), or even a few whole mini Butterfingers on top. Get creative and have fun!
Butterfinger Cake Variations
Okay, so you’ve mastered the original? Awesome! Now, let’s get a little crazy and mix things up! Here are a few fun ways to tweak the recipe and make it your own!
Chocolate Butterfinger Cake
Chocolate + Butterfinger? Yes, please! Just add about 1/4 cup of cocoa powder to the cake batter. Or, for even *more* chocolatey goodness, throw in a cup of chocolate chips. Semi-sweet or milk chocolate, whatever your heart desires!
Peanut Butter Butterfinger Cake
Peanut butter lovers, this one’s for you! Swirl a few tablespoons of peanut butter into the batter before baking. Or, you could even make a peanut butter frosting instead of the whipped topping. Just sayin’…
Butterscotch Butterfinger Cake
Want to add a little extra sweetness? Use butterscotch pudding mix instead of vanilla! Or, drizzle some butterscotch sauce over the top along with the caramel. So yummy!
Serving Suggestions for Your Butterfinger Cake
This cake is pretty amazing all on its own, but if you wanna take it to the next level? A scoop of vanilla ice cream is *always* a good idea. Or, try a dollop of whipped cream and a sprinkle of extra crushed Butterfingers. Simple perfection!
Storing Your Delicious Butterfinger Cake
Got leftovers? (If you do, you’re stronger than I am!). Cover the cake tightly with plastic wrap or foil and store it in the fridge. It’ll stay good for about 3-4 days. Honestly, though, it’s usually gone way before then!
Butterfinger Cake FAQs
Got questions? I’ve got answers! Here are a few of the most common things people ask me about this amazing Butterfinger Cake.
Can I make Butterfinger Cake ahead of time?
Absolutely! In fact, I think it’s even *better* the next day, after the flavors have had a chance to meld. Just assemble the cake (frosting and all), cover it tightly, and store it in the fridge. It’ll be ready to go whenever you need a sweet treat!
How do I keep my Butterfinger Cake from drying out?
The pudding mix really helps with this, but the key is to not overbake it! Also, make sure you cover it well when you store it. If you’re really worried, you could even brush the top with a little bit of milk before you frost it. But honestly, it’s usually so moist, you won’t even need to!
Can I freeze Butterfinger Cake?
Yep, you sure can! Just wrap it tightly in plastic wrap, then in foil, and it’ll keep in the freezer for up to 2-3 months. When you’re ready to eat it, thaw it in the fridge overnight. Just be aware that the whipped topping might change texture a bit after freezing, but it’ll still taste amazing!
Nutritional Information for Butterfinger Cake
Butterfinger Cake Disclaimer
Okay, so here’s the deal: all those nutrition numbers? They’re just estimates! It really depends on the brands you use and how big you cut your slices. So, don’t take ’em as gospel, okay?
Rate this Butterfinger Cake Recipe
Made this cake? Let me know what you think! Give it a star rating below, and tell me your favorite part in the comments!
Print
Easy Butterfinger Cake Recipe With Just 7 Ingredients
- Prep Time: 15 minutes
- Cook Time: 35 minutes
- Total Time: 50 minutes
- Yield: 12 servings 1x
- Category: Dessert
- Method: Baking
- Cuisine: American
- Diet: Vegetarian
Description
A rich and decadent Butterfinger Cake.
Ingredients
- 1 box yellow cake mix
- 1 (3.4 ounce) package instant vanilla pudding mix
- 1 cup milk
- 1/2 cup butter, melted
- 4 eggs
- 1 teaspoon vanilla extract
- 1 (10 ounce) bag Butterfinger candy bars, crushed
- 1 (16 ounce) container whipped topping
- 1/4 cup caramel sauce
Instructions
- Preheat oven to 350 degrees F (175 degrees C). Grease and flour a 9×13 inch baking pan.
- In a large bowl, combine cake mix, pudding mix, milk, melted butter, eggs, and vanilla extract. Beat until well combined.
- Stir in half of the crushed Butterfinger candy bars.
- Pour batter into prepared pan and bake for 30-35 minutes, or until a wooden skewer inserted into the center comes out clean.
- Let cake cool completely.
- Poke holes all over the cake with a fork.
- Spread whipped topping over the cake.
- Sprinkle remaining crushed Butterfinger candy bars over the whipped topping.
- Drizzle with caramel sauce.
- Refrigerate for at least 30 minutes before serving.
Notes
- For a richer flavor, use brown butter.
- Add a layer of chocolate ganache for extra decadence.
- Garnish with additional chopped Butterfinger bars.
Nutrition
- Serving Size: 1 slice
- Calories: 450
- Sugar: 40g
- Sodium: 300mg
- Fat: 25g
- Saturated Fat: 15g
- Unsaturated Fat: 8g
- Trans Fat: 1g
- Carbohydrates: 55g
- Fiber: 1g
- Protein: 4g
- Cholesterol: 75mg






