

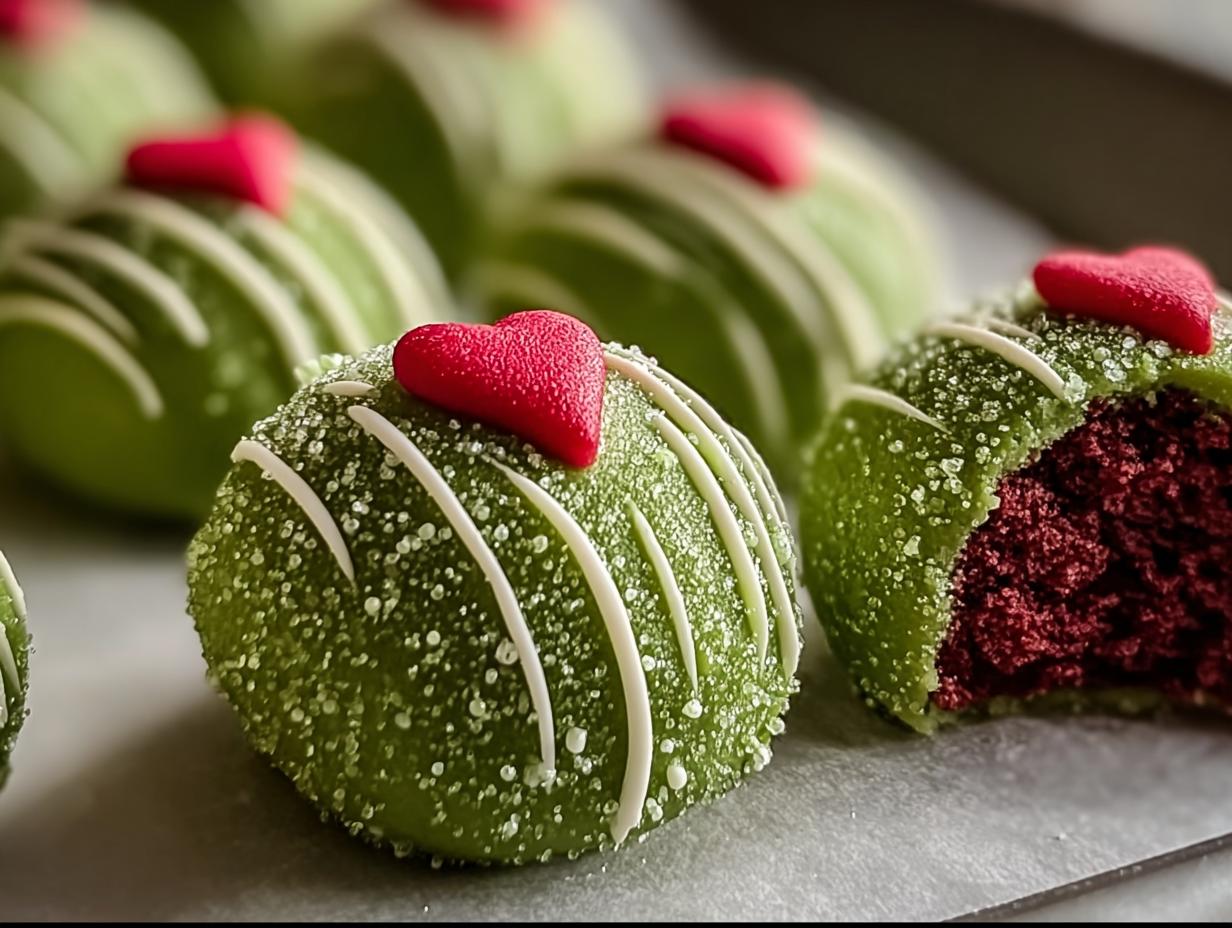
Okay, picture this: it’s December, holiday tunes are blasting, and you’re elbow-deep in sprinkles. That’s right, it’s baking season! And what’s more fun than whipping up a batch of Grinch Cake Balls? Seriously, these little guys are the *perfect* festive treat. They’re easy enough that even my slightly-disaster-prone self can manage them, and they look absolutely adorable.
I’ve been making Grinch Cake Balls for years, and they’re always a hit at holiday parties. Kids go nuts for ’em, and adults secretly snag them off the dessert table. I mean, who can resist a bright green cake ball covered in sanding sugar and a little red heart? Not me, that’s for sure! The best part? You don’t need to be a professional baker to make these. We’re talking boxed cake mix, canned frosting…easy peasy! And the vibrant green color? It just screams “holiday cheer!” Trust me, these Grinch Cake Balls are guaranteed to bring a smile to everyone’s face. Plus, they’re super fun to make!

Why You'll Love These Grinch Cake Balls
Seriously, what’s not to love? These Grinch Cake Balls are a total win, and here’s why:
Quick and Easy Grinch Cake Balls
Time crunch? No problem! This recipe uses a boxed cake mix, so it’s super speedy. You can whip up a batch in no time – perfect for those crazy holiday schedules!
Perfectly Festive Grinch Cake Balls
These aren’t just any cake balls; they’re *Grinch* cake balls! That bright green color and those little red hearts? Total holiday vibes! They look amazing on any dessert platter.
Deliciously Fun Grinch Cake Balls
Okay, red velvet cake and sweet candy melts? Yes, please! But the *real* fun is decorating them. Get the kids involved – it’s a blast!
Ingredients for Grinch Cake Balls
Alright, let’s gather our supplies! Nothing too crazy here, promise. Here’s what you’ll need to make these adorable Grinch Cake Balls. Don’t skimp on the good stuff, okay?
Cake Mix
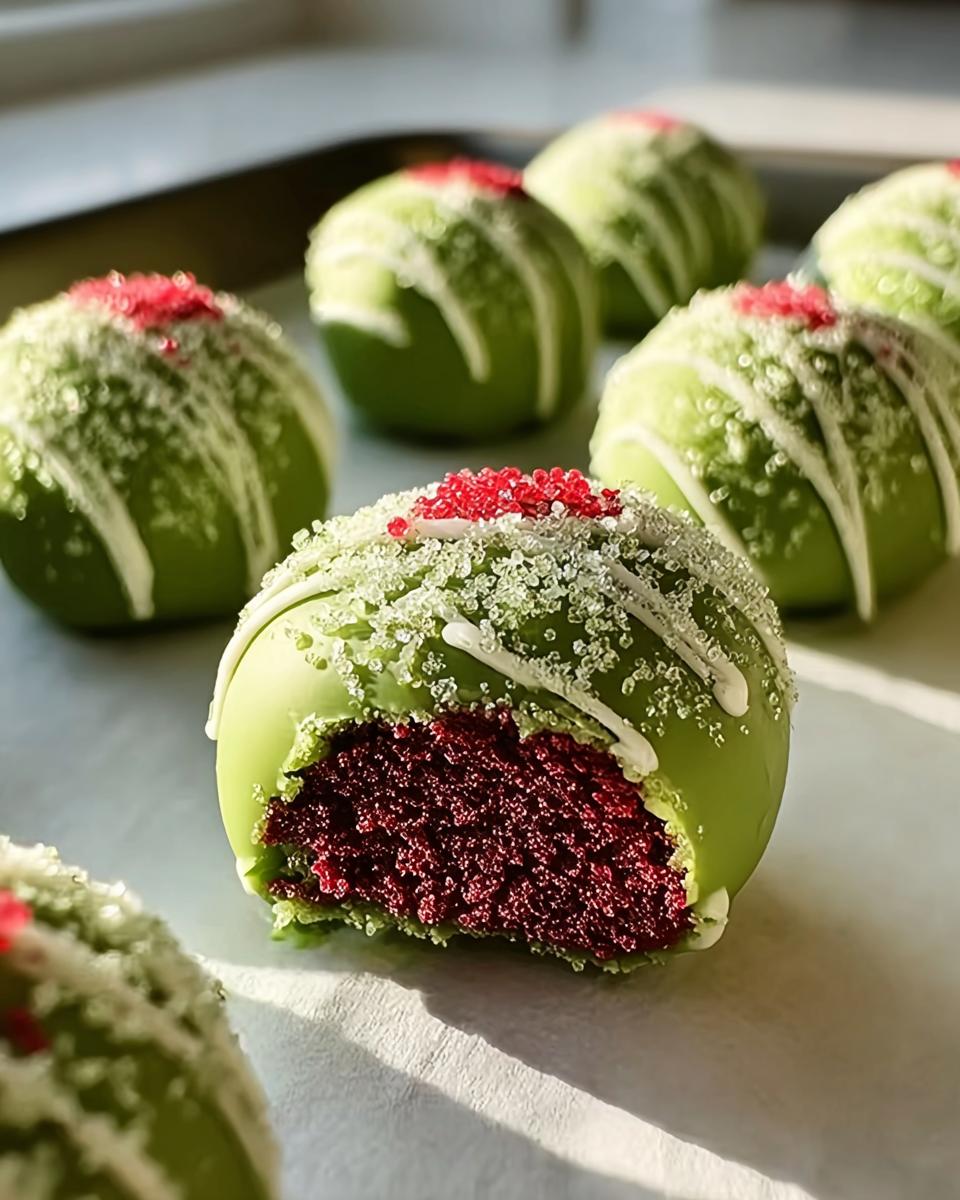
You’ll want one 15-ounce box of Red Velvet Cake Mix. Trust me, the red peeking through the green is what *makes* it!
Frosting
Grab 2 to 3 tablespoons of canned cream cheese frosting. Seriously, don’t go overboard! Too much, and your cake balls will be a sticky mess. Oops, did I say that out loud?
Candy Melts
Okay, here’s where the magic happens. You’re gonna need 12 ounces of light or vibrant green candy melts – the brighter, the better! And 3 ounces of dark green candy melts for drizzling. Oh, and don’t forget 1 tablespoon of Candy Melts Melting Aid (or 2 teaspoons of vegetable shortening). This is key for getting that smooth, dippable consistency.
Decorations
For the Grinchy details, we need dark green sanding sugar and those cute little red candy hearts. My favorite part is sticking the hearts on!
Other
And, of course, the basics: 1 1/4 cups water, 3 large eggs, and 1/3 cup vegetable oil. You probably have these already, right?
How to Prepare Grinch Cake Balls: Step-by-Step
Alright, buckle up, buttercups! Let’s get down to the nitty-gritty. Here’s how we turn those ingredients into adorable Grinch Cake Balls. Don’t worry, I’ll walk you through it!
Baking the Cake for Grinch Cake Balls
First things first, preheat your oven to 350 degrees F. Don’t skip this step! While it’s heating up, grab a 9×13-inch baking pan and grease it like crazy with nonstick spray. We don’t want any cake-sticking disasters, do we? Now, just follow the directions on the cake mix box. Easy peasy! Bake for about 25 to 30 minutes, or until a toothpick comes out clean. Let the cake cool *completely*. Seriously, completely! This usually takes about an hour. Patience, grasshopper!
Crumbling and Mixing the Cake for Grinch Cake Balls
Okay, fun part! Flip that cooled cake onto a cookie sheet and trim about 1/4-inch off all four sides. Then, slice off a super thin layer (like, 1/8-inch) from the bottom. This gets rid of any dry bits. Now, break the cake into pieces and toss it into a big bowl. Get your hands in there (I recommend gloves to avoid red velvet fingers!) and crumble it all up. It should look like…well, crumbs! Now, add 2 to 3 tablespoons of that cream cheese frosting. Mix it all together until it’s, like, totally combined. The mixture should stick together when you squeeze it. Be careful, a little frosting goes a long way! You don’t want it too sticky.
Forming the Grinch Cake Balls
Grab a medium cookie scoop (or just use your hands!) and portion out the mixture. Roll each portion into a ball. You should get around 24 to 30, depending on the size. Place ’em on a cookie sheet lined with parchment paper. Now, pop those babies in the freezer for *no more than* 10 minutes. This helps them firm up so they’re easier to dip. Don’t forget about them! We don’t want frozen solid cake balls!
Dipping and Decorating the Grinch Cake Balls
Time for the magic! Toss that 12-ounce bag of light green candy melts into a microwave-safe bowl. Microwave for 1 minute, stir, then microwave in 30-second intervals, stirring between each one, until it’s smooth as silk. If it’s too thick, add that tablespoon of Melting Aid (or 2 teaspoons of shortening). Stir until it’s thinned out, but not *too* thin! You still want it thick enough to cover the red cake. Pour the melted candy into a tall glass (like a mason jar) – this makes dipping way easier. Take those cake balls out of the freezer and roll them again to smooth out any flat spots. Dip each ball into the melted candy, tap off the excess, and place it back on the cookie sheet. Use a tall wooden skewer or a fork to dip. Now, for the final touch! Melt the dark green candy melts in a piping bag (30-second intervals in the microwave, squeezing to mix!). Snip a tiny piece off the bottom of the bag and drizzle the green over each cake ball. Quickly sprinkle with green sanding sugar and stick on a red heart. Work fast, or the candy will harden! Let them set completely, and ta-da! Grinch Cake Balls!
Tips for Perfect Grinch Cake Balls
Want to make sure your Grinch Cake Balls are total showstoppers? Here are a few little secrets I’ve learned along the way. Trust me, these tips will save you from cake ball disasters!
Don't Overmix the Cake for Grinch Cake Balls
Okay, this is a big one. Overmixing the cake batter makes it tough, and nobody wants tough cake balls! Just mix until everything’s combined, and then step away! Seriously, resist the urge to keep stirring.
Use Quality Candy Melts for Grinch Cake Balls
Cheap candy melts can be, well, a pain. They don’t melt smoothly, and they can taste kinda waxy. Splurge on the good stuff – it makes a *huge* difference in the final result. You’ll thank me later!
Properly Thaw Grinch Cake Balls
So you froze your cake balls (good job!), but now what? Don’t just leave them on the counter! Pop them in the fridge to thaw slowly. This keeps ’em from getting weird and sticky. Trust me on this one!
Storing Your Grinch Cake Balls
Alright, so you’ve made these adorable Grinch Cake Balls, and somehow, you haven’t eaten them all in one sitting (impressive!). Here’s how to keep ’em fresh!
Room Temperature Storage for Grinch Cake Balls
Pop those little guys in an airtight container, and they’ll be good at room temperature for up to a week. If you’re stacking them, put some parchment paper between the layers to keep ’em from sticking. Nothin’ worse than a cake ball pile-up!
Freezing Grinch Cake Balls
Want to save ’em for later? You can freeze these Grinch Cake Balls for up to 6 weeks! Just toss ’em in an airtight container or a Ziploc bag (squeeze out the extra air!). When you’re ready to eat ’em, just move them from the freezer to the fridge overnight to thaw. Easy peasy!
Frequently Asked Questions About Grinch Cake Balls
Got questions? I’ve got answers! Here are a few things folks often wonder about when making these Grinch Cake Balls. Don’t be shy – I’ve been there, too!
Can I use a different flavor of cake mix for these Grinch Cake Balls?
Sure, you *could* use a different flavor, but honestly? The red velvet cake mix gives you that awesome red-and-green contrast when you bite into them! It just makes ’em extra festive, ya know? But hey, if you’re feeling adventurous, go for it! Just don’t blame me if they’re not quite as Grinchy!
Can I make these Grinch Cake Balls ahead of time?
Absolutely! These are *perfect* for making ahead. They store like a dream in the freezer. So, if you’re prepping for a party, just whip up a batch a few days (or even weeks!) in advance. Less stress, more Grinch Cake Balls. Win-win!
What if my candy melts are too thick when making Grinch Cake Balls?
Ugh, thick candy melts are the worst! Don’t panic! Just add a little more melting aid or vegetable shortening, a tiny bit at a time, until they’re nice and smooth and dippable. Trust me, you’ll get there!
Nutritional Information for Grinch Cake Balls
Okay, real talk: I’m not a nutritionist! So, I can’t give you exact numbers. Just know that the nutrition info for these Grinch Cake Balls will vary depending on the brands you use. Enjoy responsibly!
Make Your Own Grinch Cake Balls Today!
So, what are you waiting for? Go make some Grinch Cake Balls! And hey, if you do, leave a comment and tell me how they turned out! Or share a pic on social media – I’d love to see ’em!
Print
Naughty but Nice 30 Grinch Cake Balls Recipe
- Prep Time: 40 minutes
- Cook Time: 30 minutes
- Total Time: 2 hours 10 minutes
- Yield: 24 balls 1x
- Category: Dessert
- Method: Baking
- Cuisine: American
- Diet: Vegetarian
Description
Grinch Cake Balls are easily made with a boxed cake mix, canned frosting, and candy melts. They make two dozen cake balls that are perfect for the holidays.
Ingredients
- 1 15 ounce box Red Velvet Cake Mix
- 1 1/4 cups water
- 3 large eggs
- 1/3 cup vegetable oil
- 2 to 3 tablespoons canned cream cheese frosting
- 12 ounces Light or Vibrant Green Candy Melts
- 3 ounces Dark Green Candy Melts
- 1 tablespoon Candy Melts Melting Aid or 2 teaspoons vegetable shortening
- Dark Green Sanding Sugar
- Red Candy Hearts
Instructions
- Preheat oven to 350 degrees F and grease a 9×13-inch baking pan with nonstick spray, set aside.
- In a large bowl, mix together the cake mix, water, eggs, and oil.
- Pour the batter into the prepared cake pan and bake for 25 to 30 minutes. Let the cake cool completely before using, about 30 to 60 minutes.
- Flip the cake upside down on a cookie sheet and trim 1/4-inch off all four sides. Thinly slice off the bottom layer, approximately 1/8-inch or less. This gets rid of any dry pieces.
- Break apart the cake and place in a large bowl and crumble up with hands or fork. I recommend using gloves to keep your hands clean.
- Add 2 to 3 tablespoons of frosting to the bowl and mix with the cake crumbs until fully incorporated. The mixture should stick together when squeezed. A little frosting goes a long way, you do not want to add too much.
- Using a medium cookie scoop, portion out the mixture and roll it into balls. You should have approximately 24 to 30 balls depending on the size. Place on a cookie sheet with parchment paper.
- Freeze balls for no longer than 10 minutes.
- Remove balls from the freezer and roll them again to remove any flat spots.
- Add the 12-ounce bag of light green candy melts into a Microwave safe bowl and melt for 1 minute, stir, then microwave at 30-second intervals, stirring between each one until smooth.
- Add 1 tablespoon of Melting Aid (or 2 teaspoons shortening) and stir, until thinned out. Do not add too much of the melting aid, you still want a thicker consistency to cover the color of the cake balls.
- Place the melted candy melts into a taller glass such as a mason jar or wide-mouth glass, so to cover the whole cake ball when dipping.
- Dip the cake balls and tap off any excess candy melts and place back on the cookie sheet with wax paper or parchment paper. You can use a tall wooden skewer or fork to dip cake balls.
- Place the dark green candy melts in a piping bag standing up in a microwave-safe mug and heat at 30-second intervals, squeezing gently with your hands, until fully melted. Snip a small piece off the bottom of the piping bag so you get a thin opening.
- Pipe the green around the cake ball and quickly sprinkle the green sanding sugar and place a small red heart on the ball. You will want to pipe and stick on the hearts a few at a time so the melts do not harden before you get to them. Let set.
Notes
- Store the cake pops in an airtight container at room temperature for up to 1 week. They may also be stored in a gallon Ziploc bag with the excess air squeezed out of it. If storing in a container you may want to separate the layers of the cake pops with parchment paper to prevent sticking.
- These cake pops can be frozen to be eaten later. Store them in an airtight container or Ziploc bag for up to 6 weeks in the freezer. When you are ready to enjoy them just transfer them from the freezer to the refrigerator to thaw overnight.
Nutrition
- Serving Size: 1 ball
- Calories: Unknown
- Sugar: Unknown
- Sodium: Unknown
- Fat: Unknown
- Saturated Fat: Unknown
- Unsaturated Fat: Unknown
- Trans Fat: Unknown
- Carbohydrates: Unknown
- Fiber: Unknown
- Protein: Unknown
- Cholesterol: Unknown






