


Oh, butter tarts! Is there anything more wonderfully, unabashedly Canadian? Seriously, these little guys are practically woven into the fabric of our culture. We’re talking flaky pastry cradling a sweet, gooey filling that just begs to be devoured. The Classic Canadian Butter Tarts Recipe is more than just a dessert; it’s pure nostalgia.
I remember the first time I had a truly *amazing* butter tart. It was at a church bake sale, and honestly, I wasn’t expecting much. But one bite, and wow! The pastry was perfectly crisp, the filling was like liquid caramel, and that little hint of raisin was just… chef’s kiss! I was hooked. I knew I needed to learn to make these myself.
And let me tell you, finding the *perfect* Classic Canadian Butter Tarts Recipe was a journey. Some were too dry, some were too sweet, some just…missed the mark. But after tons of tweaking (and maybe a few kitchen disasters, oops!), I finally landed on a recipe that I think truly captures the magic of this iconic treat. And now, I’m sharing it with you!

Gather Your Ingredients for This Classic Canadian Butter Tarts Recipe
Alright, let’s get prepped! For this Classic Canadian Butter Tarts Recipe, you’ll need: 1 1/2 cups all-purpose flour, 1/2 tsp salt, 1/2 cup *cold*, cubed unsalted butter (I swear by the stuff from Costco!), 1/4 cup cold vegetable shortening, 5-7 tbsp ice water, 1/2 cup melted butter, 1 cup packed brown sugar, 1/4 cup corn syrup, 1 egg (beaten, please!), 1 tsp vanilla extract, and 1/2 cup raisins (optional, but c’mon, they’re classic!).
Equipment Needed to Make Classic Canadian Butter Tarts Recipe
Okay, gear up! You’ll need: mixing bowls (a couple different sizes!), measuring cups and spoons (gotta be precise!), a pastry cutter (or a food processor if you’re fancy!), a rolling pin, and a standard 12-cup muffin tin. If you don’t have a pastry cutter, two butter knives work in a pinch! Trust me, I’ve been there.
Step-by-Step Instructions for the Best Classic Canadian Butter Tarts Recipe
Alright, let’s get down to business! Follow these steps, and you’ll be sinking your teeth into warm, gooey butter tarts before you know it. Don’t worry, I’ll walk you through it!
Making the Pastry for Classic Canadian Butter Tarts Recipe
First, grab a big bowl and whisk together your flour and salt. Then, toss in that *cold* butter and shortening. Now, here’s the key: you want to cut the butter and shortening into the flour until it looks like coarse crumbs. A pastry cutter is great for this, but honestly, I usually just use my fingers (clean ones, of course!). The colder the ingredients, the flakier your crust will be, trust me!
Preparing the Filling for Classic Canadian Butter Tarts Recipe
Okay, time for the good stuff! In another bowl, whisk together your melted butter, brown sugar, corn syrup, beaten egg, and vanilla extract. Get it nice and smooth! If you’re using raisins (and you totally should!), stir them in now. My favorite part is that sweet, caramelly smell. Yum!
Assembling and Baking Your Classic Canadian Butter Tarts Recipe
Preheat your oven to 375°F (190°C). Now, roll out your pastry on a lightly floured surface. Use a cookie cutter or a knife to cut out circles that are bigger than your muffin tin cups. Gently press each circle into a muffin cup. Don’t worry if they aren’t perfect; rustic is charming!
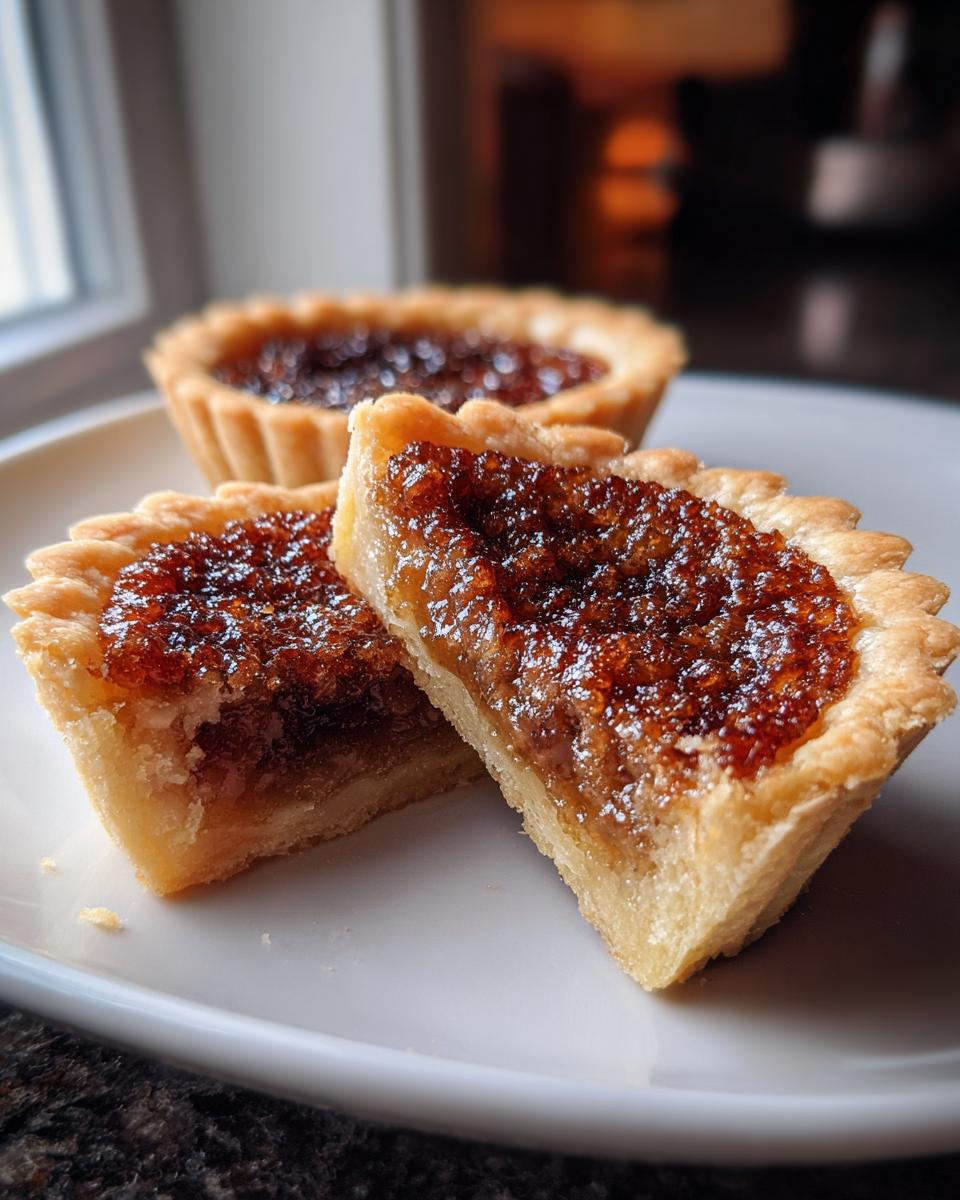
Spoon the filling into each tart shell, filling them about two-thirds full. You don’t want them overflowing! Bake for 18-20 minutes, or until the pastry is golden brown and the filling is set – it should be bubbly and slightly firm to the touch. Keep an eye on them; ovens can be tricky!
Let the tarts cool in the muffin tin for a few minutes before transferring them to a wire rack to cool completely. And then… enjoy! But careful, the filling is HOT!
Tips for Perfecting Your Classic Canadian Butter Tarts Recipe
Want to take your Classic Canadian Butter Tarts Recipe to the next level? I’ve got you covered! A soggy crust is a butter tart tragedy, so make sure your oven is *fully* preheated. And remember that cold butter in the pastry? Seriously key! Overfilling the tarts is another common mistake – resist the urge! You want gooey, not overflowing.
For that perfect gooeyness, keep an eye on them in the oven. They should be set but still have a slight wiggle. My personal tip? Brush the pastry with a little egg wash before baking for a gorgeous golden shine. Trust me, it makes all the difference!
Ingredient Notes and Substitutions for Your Classic Canadian Butter Tarts Recipe
Let’s talk ingredients! All-purpose flour is my go-to for the pastry, but you *can* use pastry flour for an even more tender crust. Brown sugar gives that classic caramel flavor, but dark brown sugar will punch it up even more! If you’re not a raisin fan (gasp!), try chopped walnuts or pecans. For a gluten-free version, use a gluten-free flour blend, but be prepared for a slightly different texture. I haven’t tried it myself, but I’ve heard it works!

Storing and Reheating Your Classic Canadian Butter Tarts Recipe
So, you’ve managed to resist eating *all* the Classic Canadian Butter Tarts Recipe in one sitting? Impressive! To store leftovers, just pop them in an airtight container at room temperature. They’ll stay good for a few days (if they last that long!). Want to warm them up? A few seconds in the microwave or a quick zap in a warm oven will bring back that gooey goodness!
Frequently Asked Questions About Classic Canadian Butter Tarts Recipe
Got questions about this Classic Canadian Butter Tarts Recipe? I’ve got answers! Here are a few common questions I get asked all the time:
Can I freeze butter tarts? Absolutely! Just let them cool completely, then wrap them individually in plastic wrap and pop them in a freezer bag. They’ll keep for a couple of months. When you’re ready to eat them, thaw them at room temperature and warm them up – yum!
What can I use instead of corn syrup? If you’re not a fan of corn syrup, you can substitute it with golden syrup or even honey. Keep in mind that the flavor will be slightly different, but still totally delicious! Some people even use maple syrup for a super Canadian twist!
How do I prevent the filling from being too runny? This is a big one! Make sure you don’t overfill the tart shells, and be sure to bake them until the filling is set but still slightly wobbly. Overbaking will make them too dry, but underbaking will leave you with a runny mess. It’s a fine line, I know! Also, make sure your oven temperature is accurate.
Nutritional Information for Classic Canadian Butter Tarts Recipe
Okay, important disclaimer time! The nutritional information for this Classic Canadian Butter Tarts Recipe can vary *a lot* depending on the exact ingredients you use (different brands, different types of sugar, etc.). So, the numbers you see floating around online are just estimates, okay? I’m not providing precise nutritional info here, so if you need that, you’ll want to calculate it yourself based on *your* specific ingredients. Just wanted to give you a heads-up!
Enjoyed This Classic Canadian Butter Tarts Recipe?
Woohoo! I hope you loved making (and eating!) these Classic Canadian Butter Tarts Recipe as much as I do! If you did, please leave a comment and rate the recipe! And hey, share it with your friends on social media – let’s spread the butter tart love!
Print
Classic Canadian Butter Tarts Recipe: Avoid 3 Dreaded Mistakes
- Prep Time: 30 minutes
- Cook Time: 20 minutes
- Total Time: 1 hour
- Yield: 12 tarts 1x
- Category: Dessert
- Method: Baking
- Cuisine: Canadian
- Diet: Vegetarian
Description
Enjoy these classic Canadian butter tarts. They feature a flaky pastry and a sweet, gooey filling.
Ingredients
- 1 1/2 cups all-purpose flour
- 1/2 teaspoon salt
- 1/2 cup cold unsalted butter, cubed
- 1/4 cup cold vegetable shortening
- 5–7 tablespoons ice water
- 1/2 cup butter, melted
- 1 cup brown sugar
- 1/4 cup corn syrup
- 1 egg, beaten
- 1 teaspoon vanilla extract
- 1/2 cup raisins (optional)
Instructions
- Make the pastry: Combine flour and salt. Cut in butter and shortening until mixture resembles coarse crumbs.
- Add ice water, 1 tablespoon at a time, until dough comes together.
- Wrap dough and chill for 30 minutes.
- Make the filling: Mix melted butter, brown sugar, corn syrup, egg, and vanilla. Stir in raisins, if using.
- Roll out pastry and cut into circles. Press into muffin tins.
- Fill each tart shell with filling.
- Bake at 375°F (190°C) for 18-20 minutes, or until pastry is golden and filling is set.
- Let cool before serving.
Notes
- For a richer flavor, use dark brown sugar.
- Add nuts or other dried fruits to the filling for variety.
- Store baked tarts in an airtight container at room temperature.
Nutrition
- Serving Size: 1 tart
- Calories: 250
- Sugar: 25g
- Sodium: 100mg
- Fat: 12g
- Saturated Fat: 7g
- Unsaturated Fat: 4g
- Trans Fat: 0g
- Carbohydrates: 35g
- Fiber: 1g
- Protein: 2g
- Cholesterol: 40mg






